This document outlines the process of syncing booking information between BNBForms with Google Calendar and Apple Calendar via iCal.
iCal (iCalendar) is a standardized data format designed for storing and exchanging calendar events, including bookings of rental properties.
Many popular property management platforms and calendar applications support iCal synchronization, including:
- Online Travel Agencies (OTAs): Airbnb, Booking.com, Vrbo, etc.
- Personal calendars: Google Calendar, Apple Calendar, Microsoft Outlook, etc.
BNBForms supports two-way synchronization, where updates made in any connected calendar are reflected in all others.
The specific steps for setting up iCal synchronization will vary depending on the calendar application you’re using. Below you’ll find step-by-step guides for Google Calendar & Apple Calendar.
How to sync bookings with Google Calendar
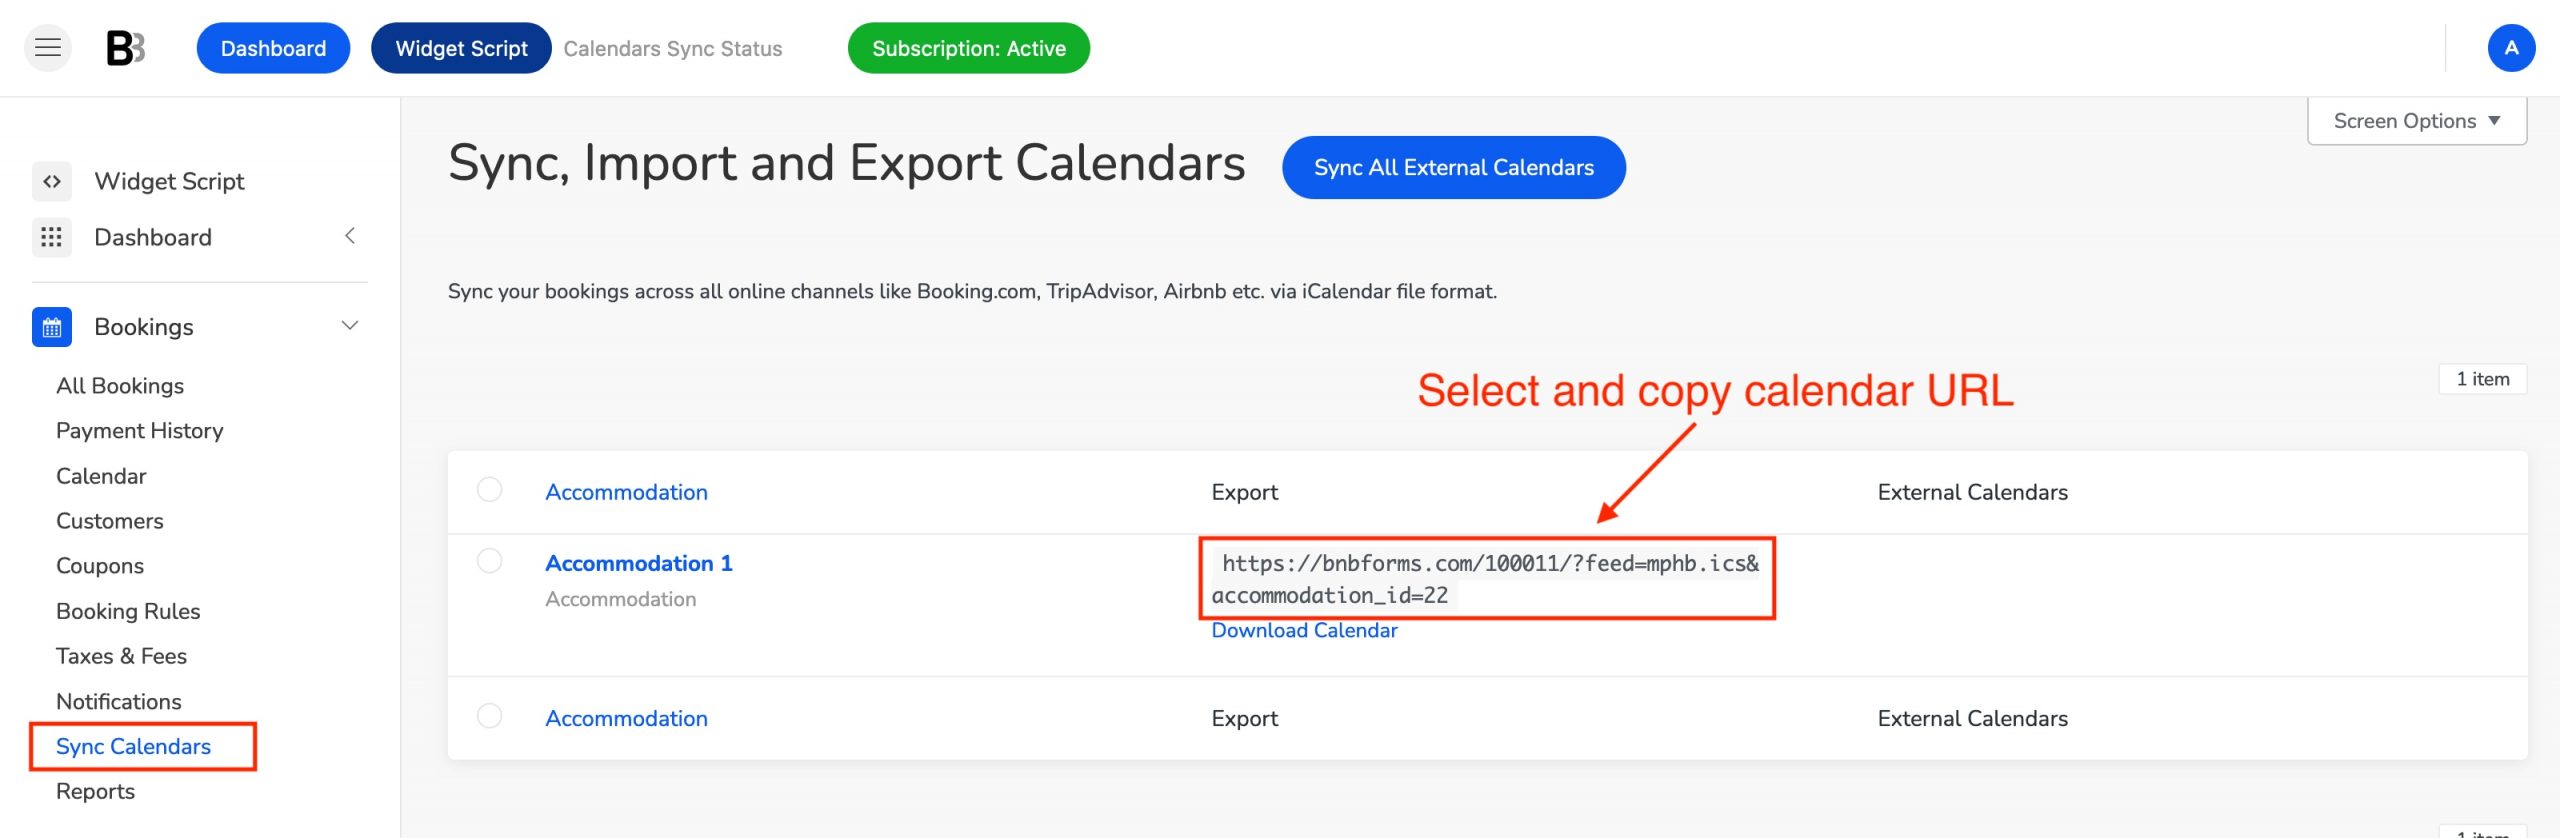
1. Locate your calendar URLs.
All calendar URLs associated with your rental properties can be found via Dashboard > Bookings > Sync Calendars.
2. Copy your calendar URL.
Copy your calendar URL located in the “Export” column.
3. Open your Google Calendar.
Navigate to https://calendar.google.com/ in your browser.
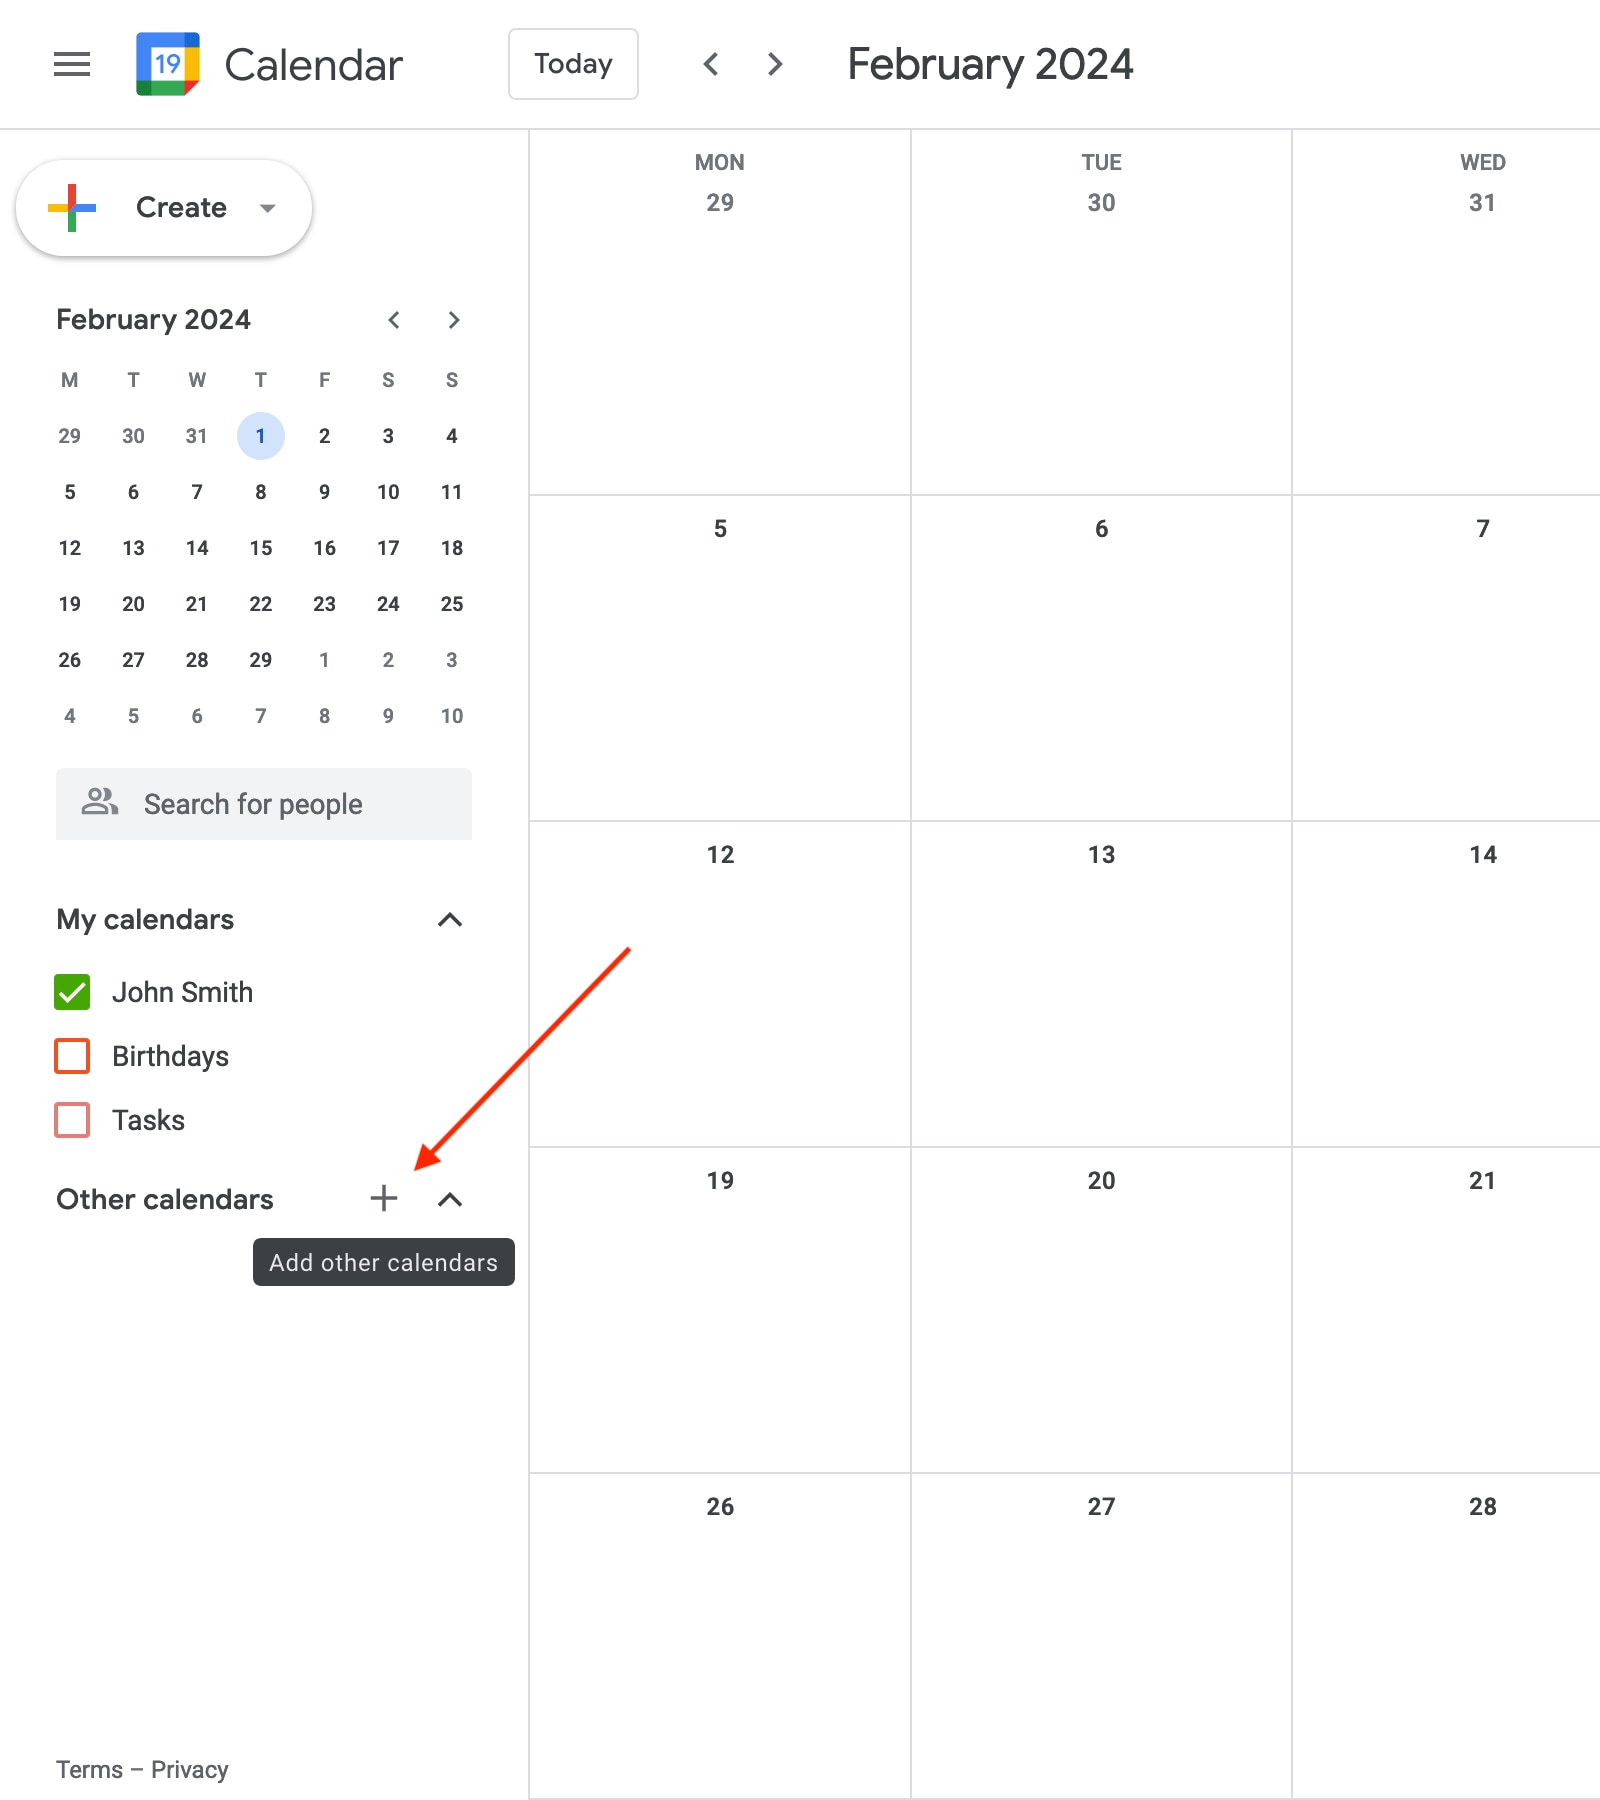
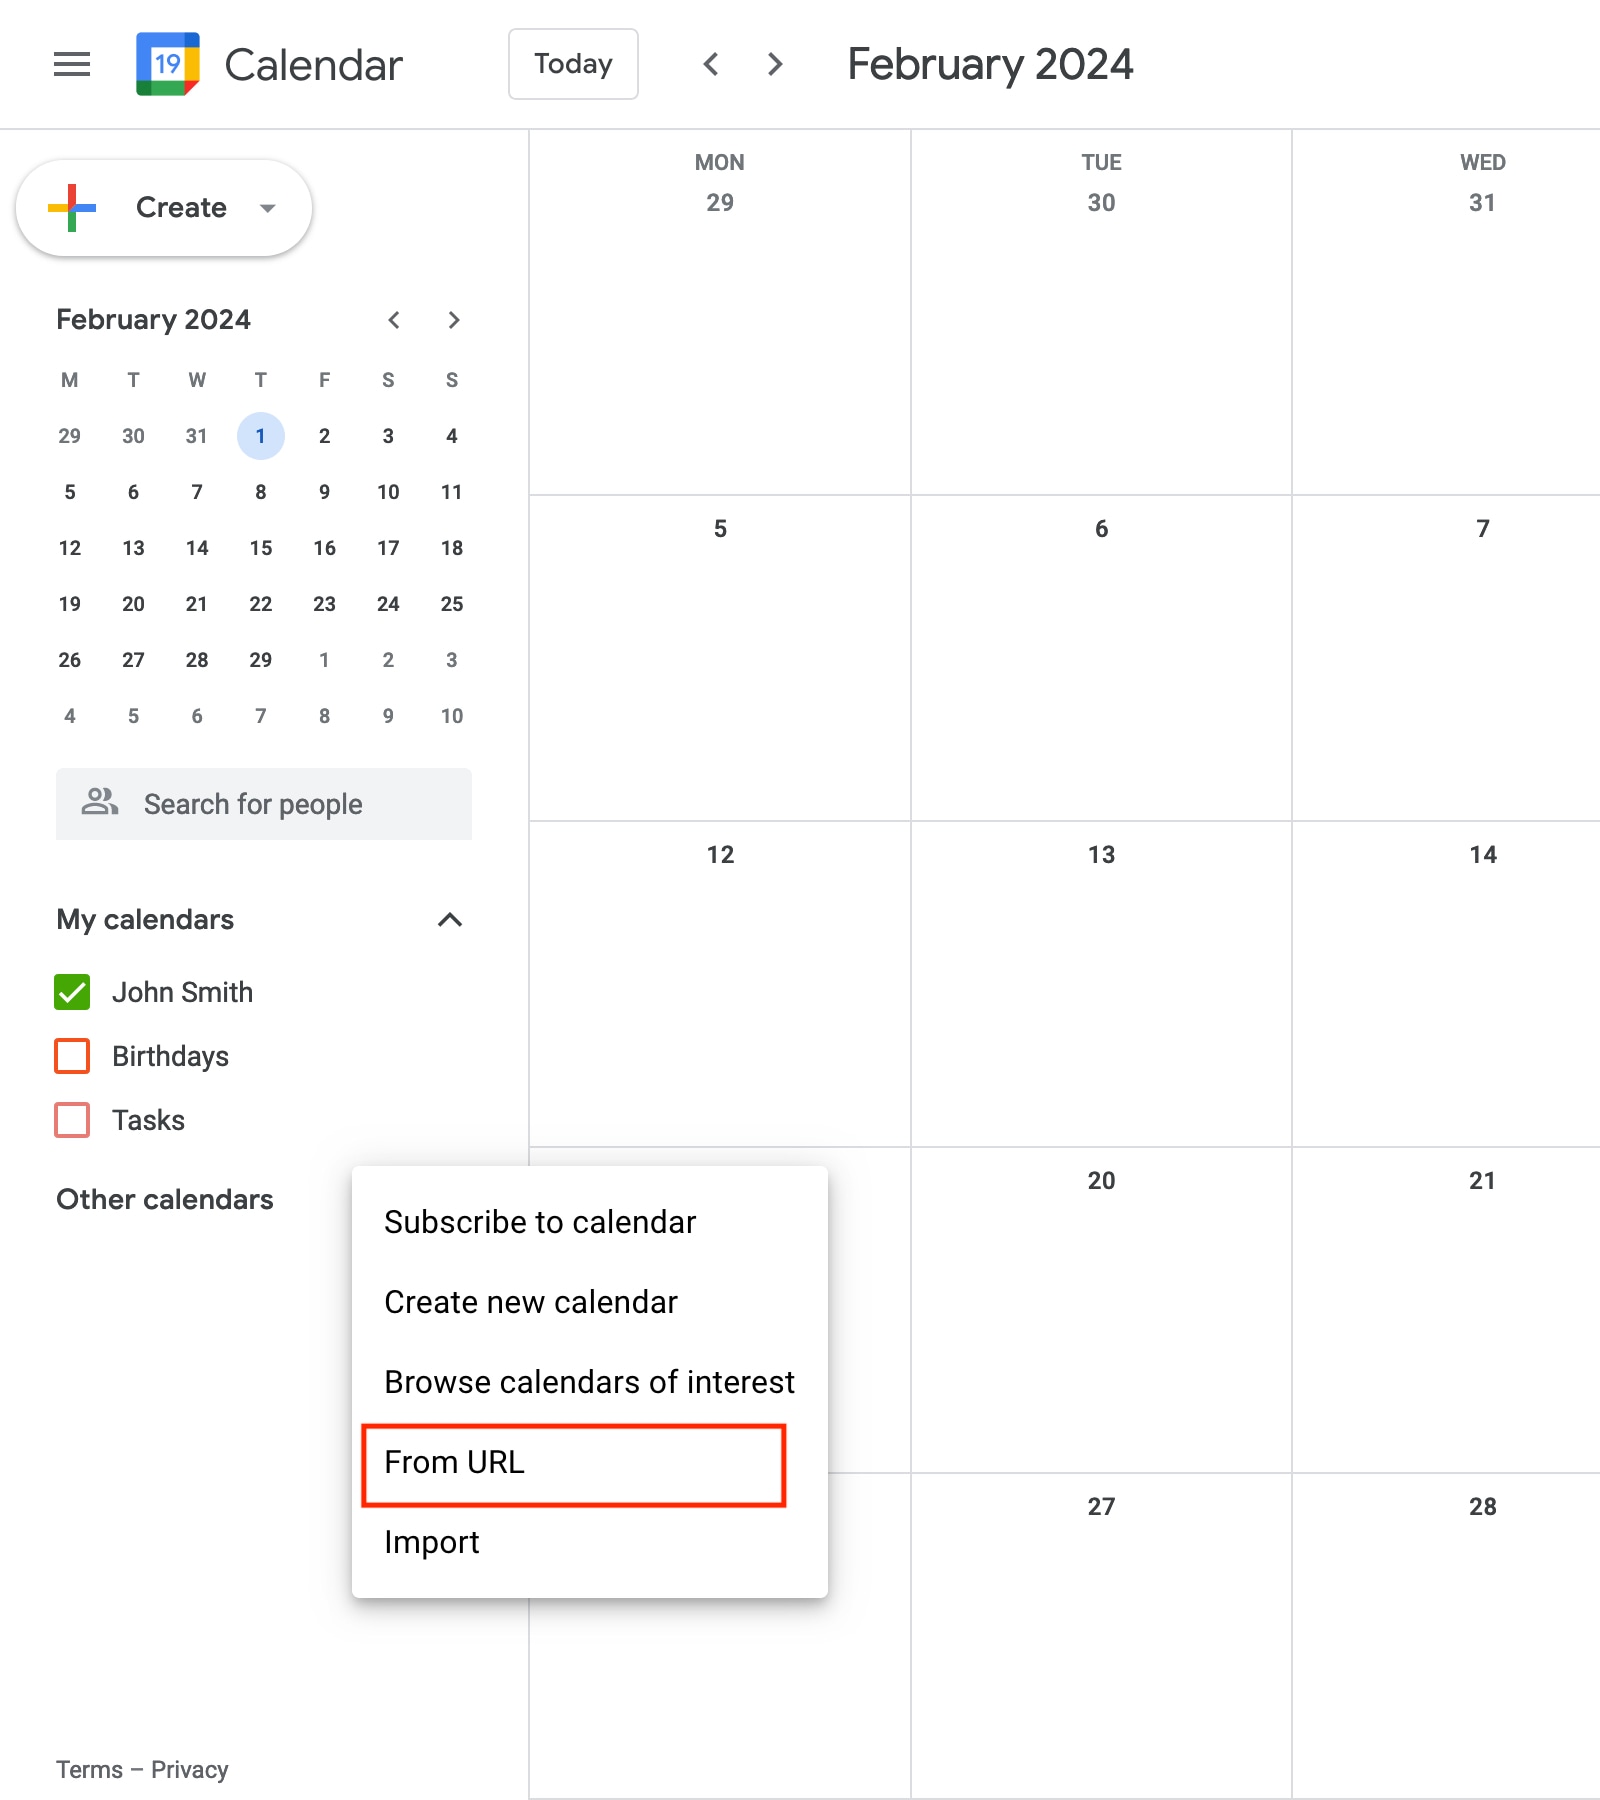
4. In the Other Calendars menu, press the plus icon and choose ‘From URL’.
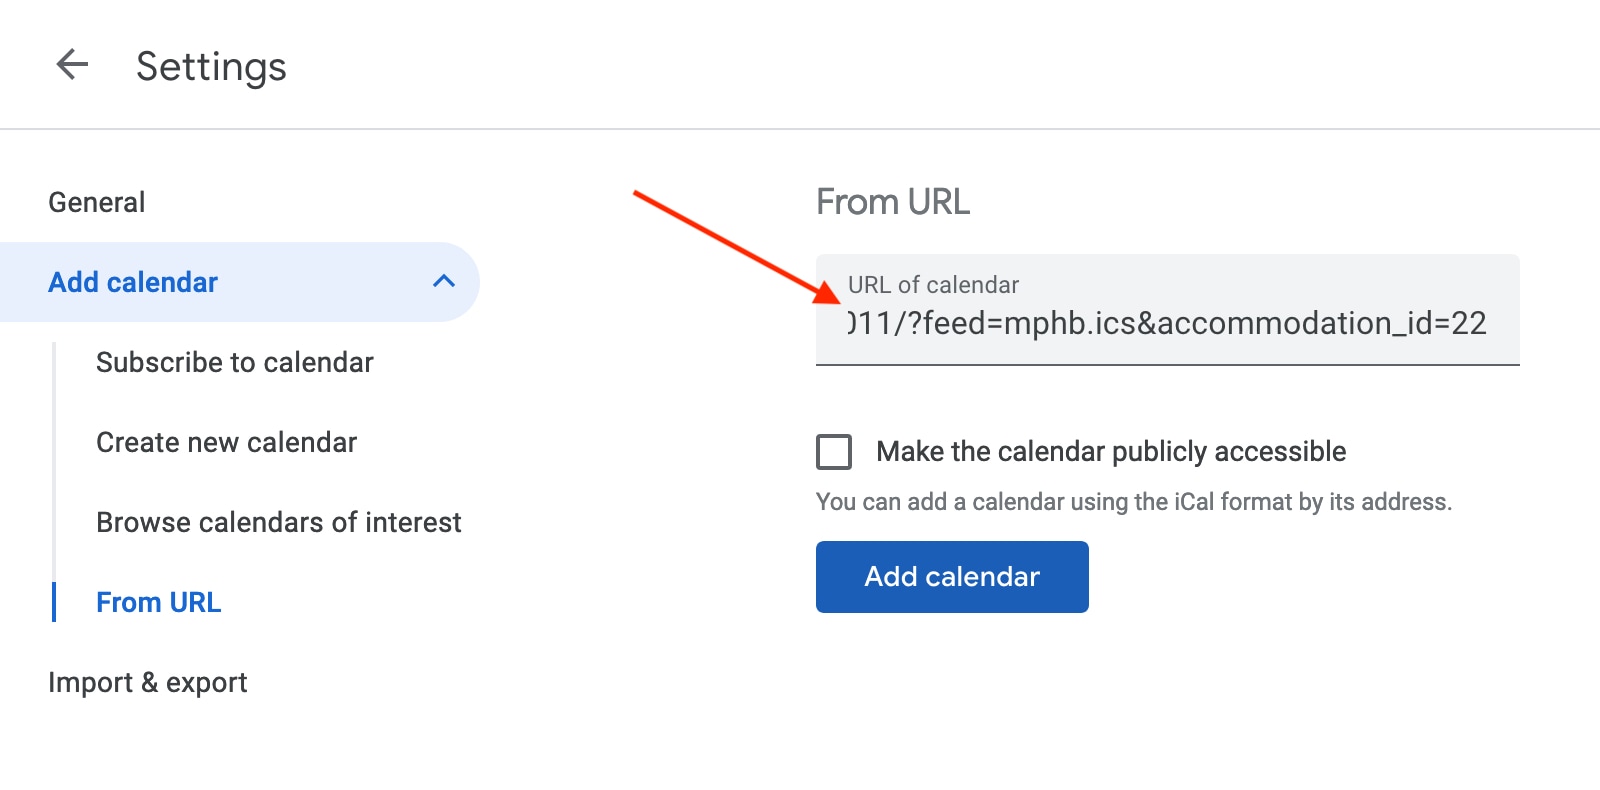
5. Paste the link of your property calendar that you copied earlier into the designated field, then click the ‘Add calendar’ button.
The calendar will appear in the list on the left side and Google will try to fetch all bookings of this property made on your website. You can click on the calendar and assign it a descriptive name for easier reference.
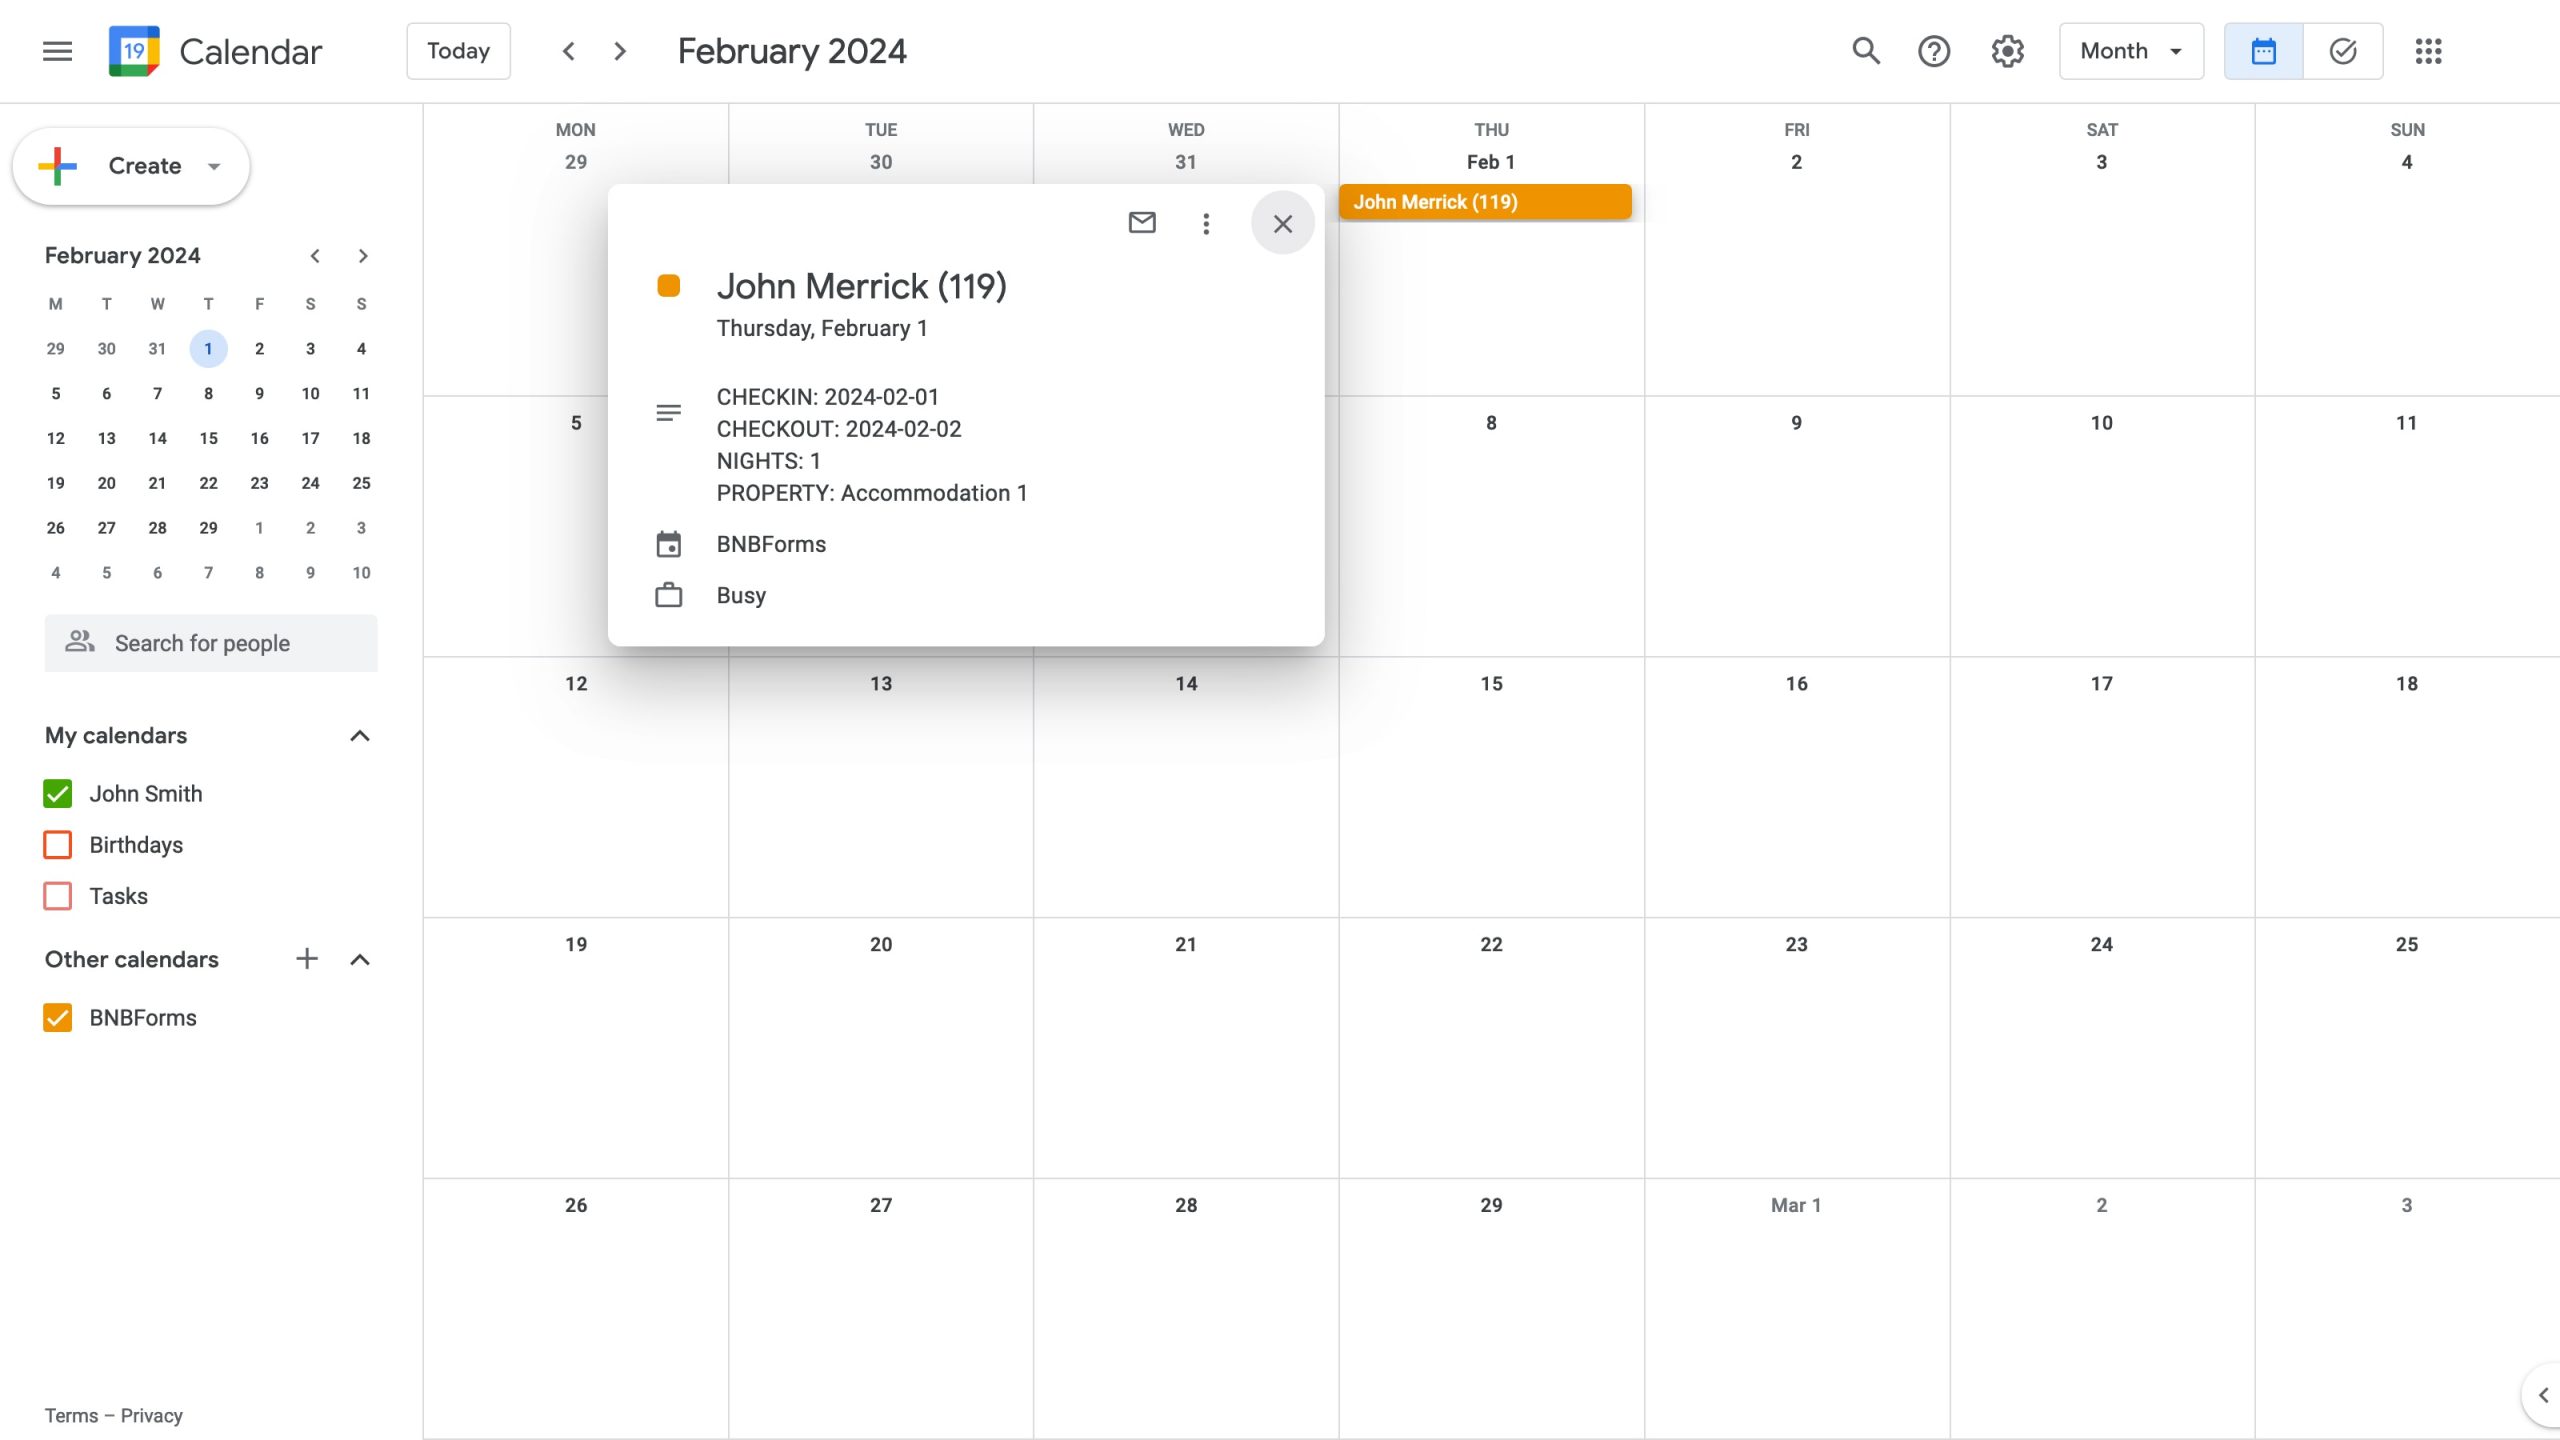
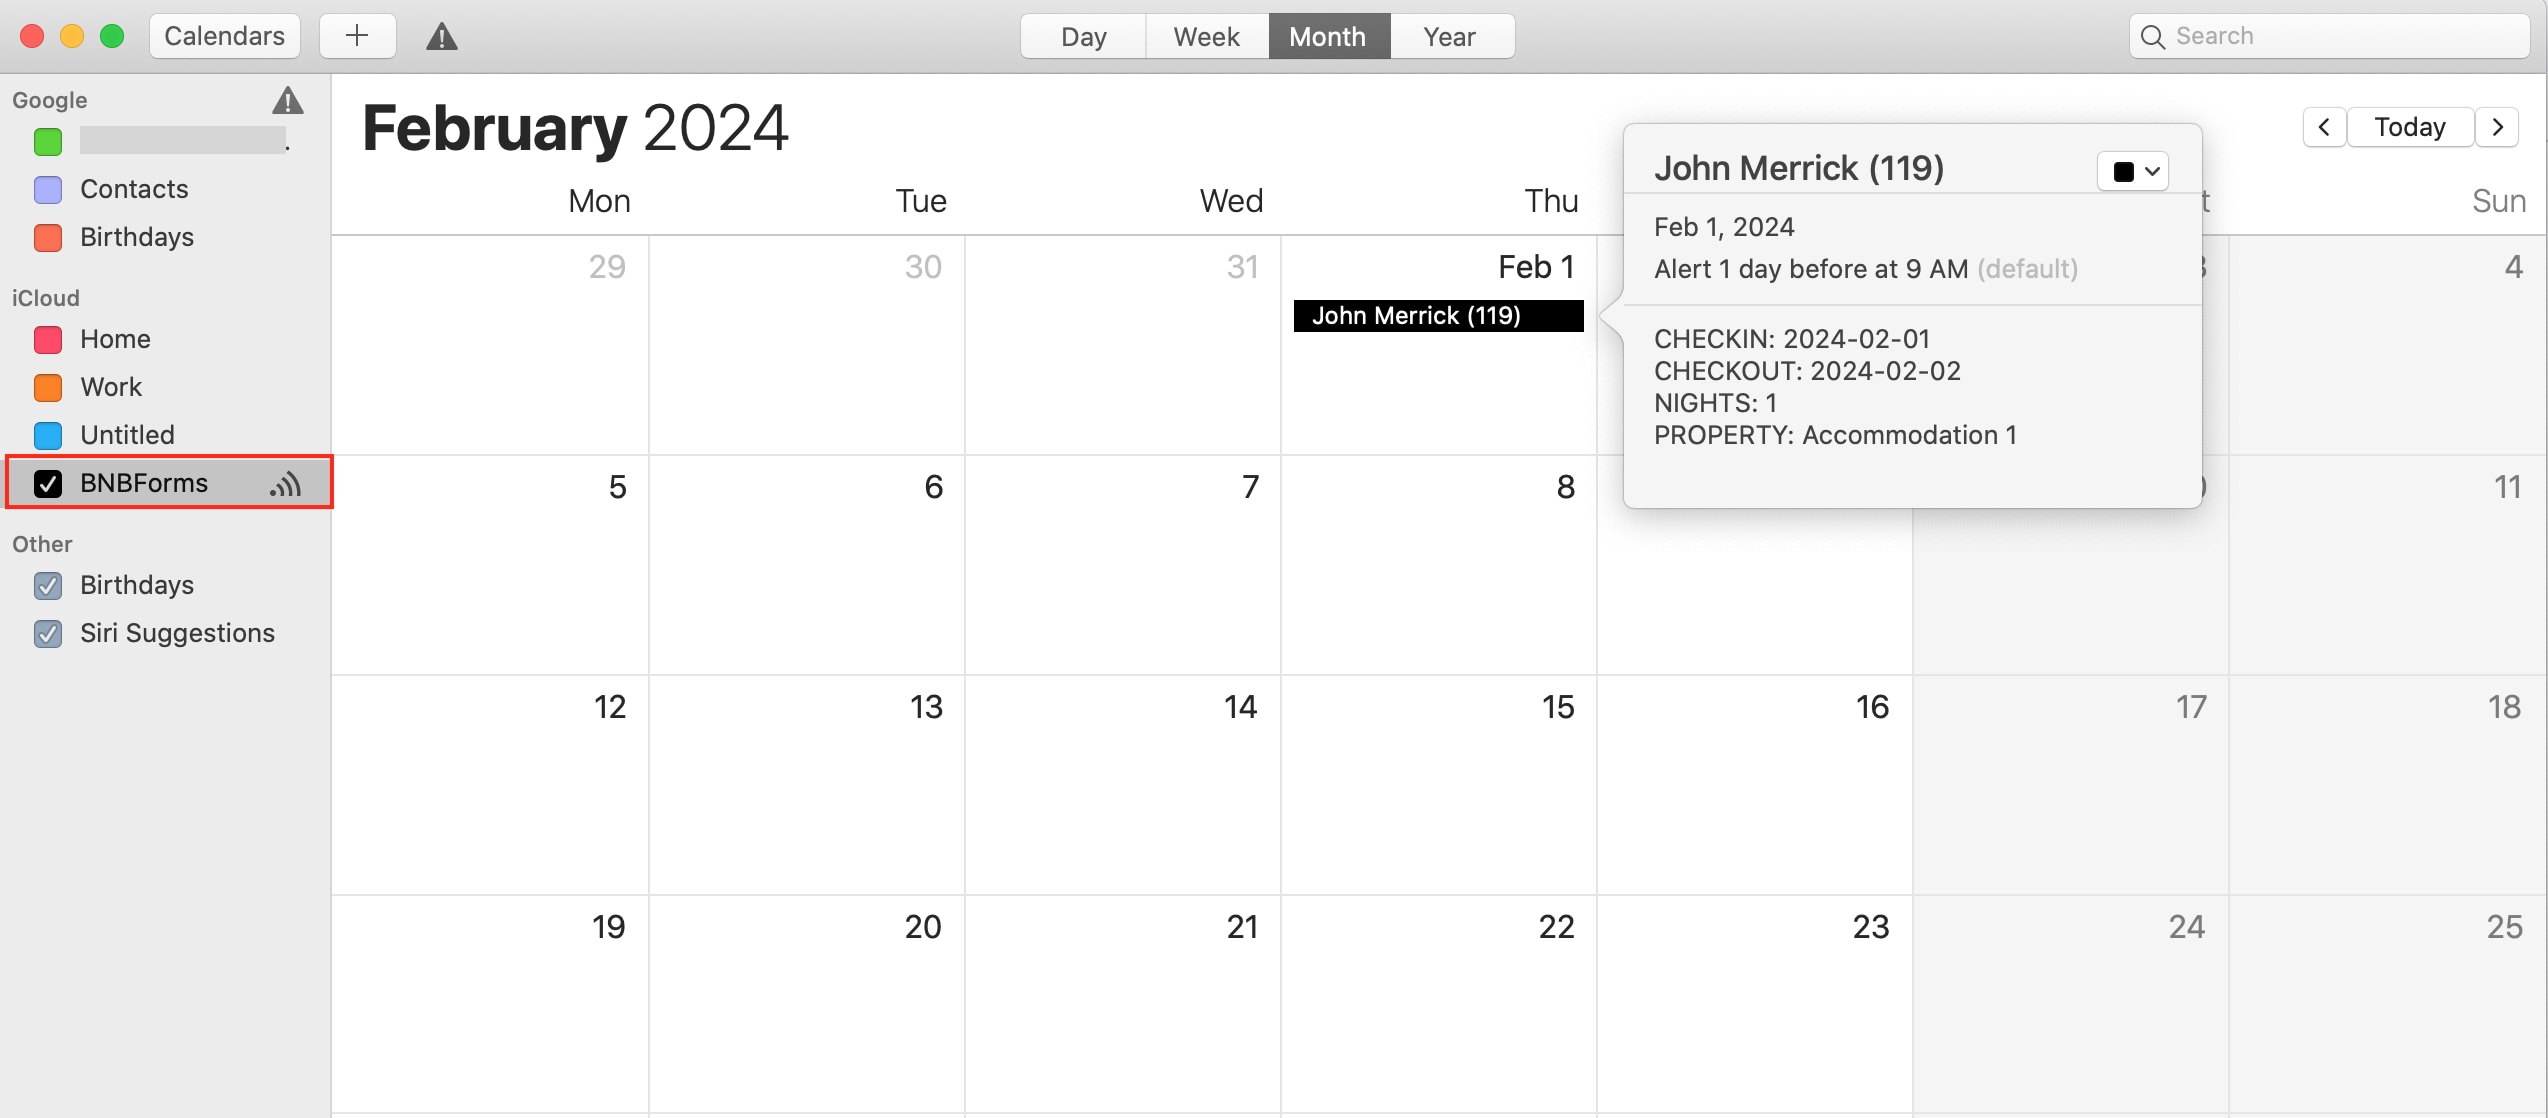
6. Go back to the main screen to review imported bookings.
You can click on a booking to view additional information.
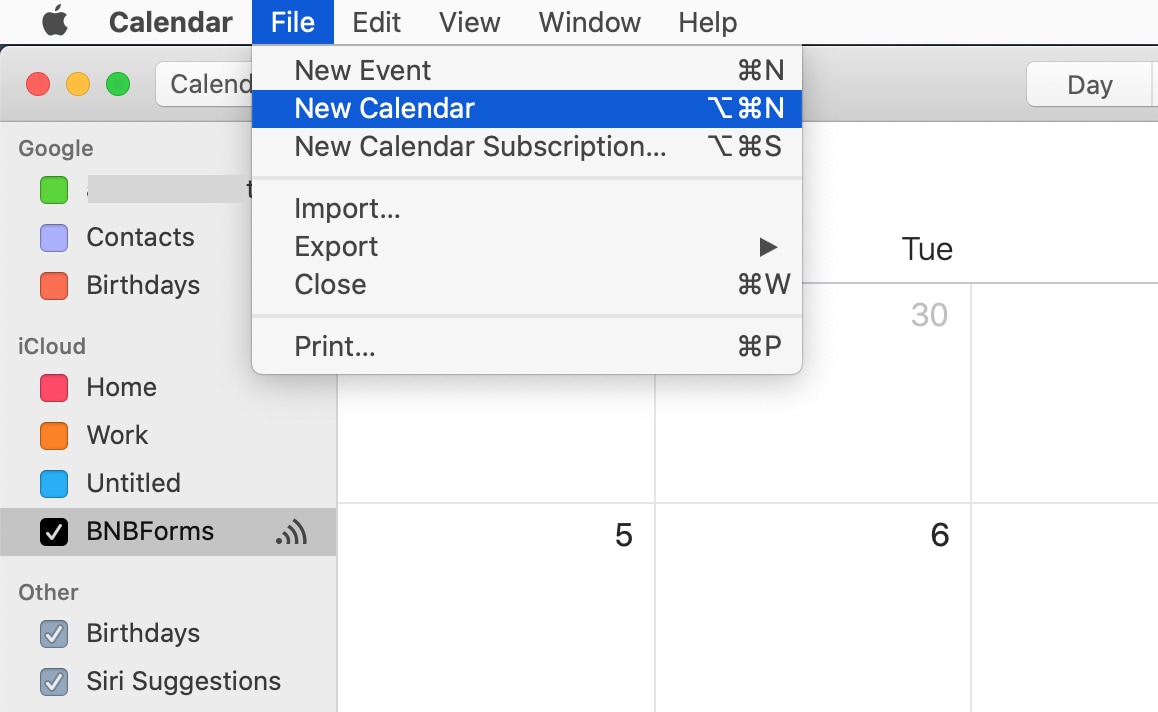
7. Create a new calendar to export bookings.
While the “From URL” calendar is read-only, which means you can only import bookings from your website, to create new bookings in Google Calendar and export them back to your website (BNBForms account), you must create a new calendar.
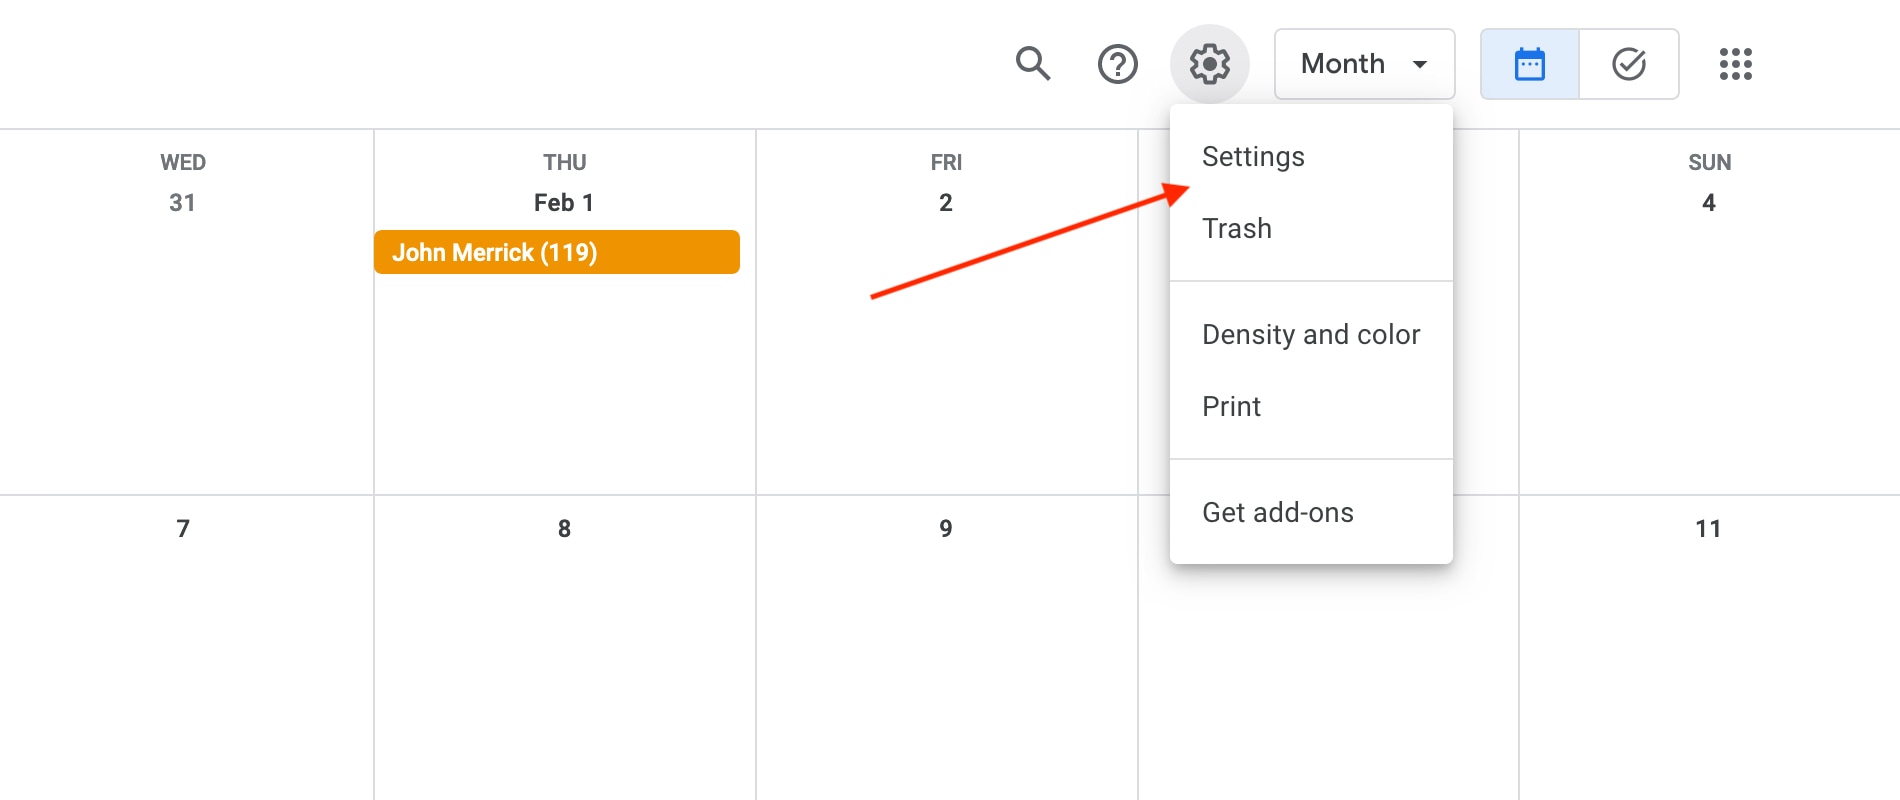
8. Click on the gear icon and choose Settings.
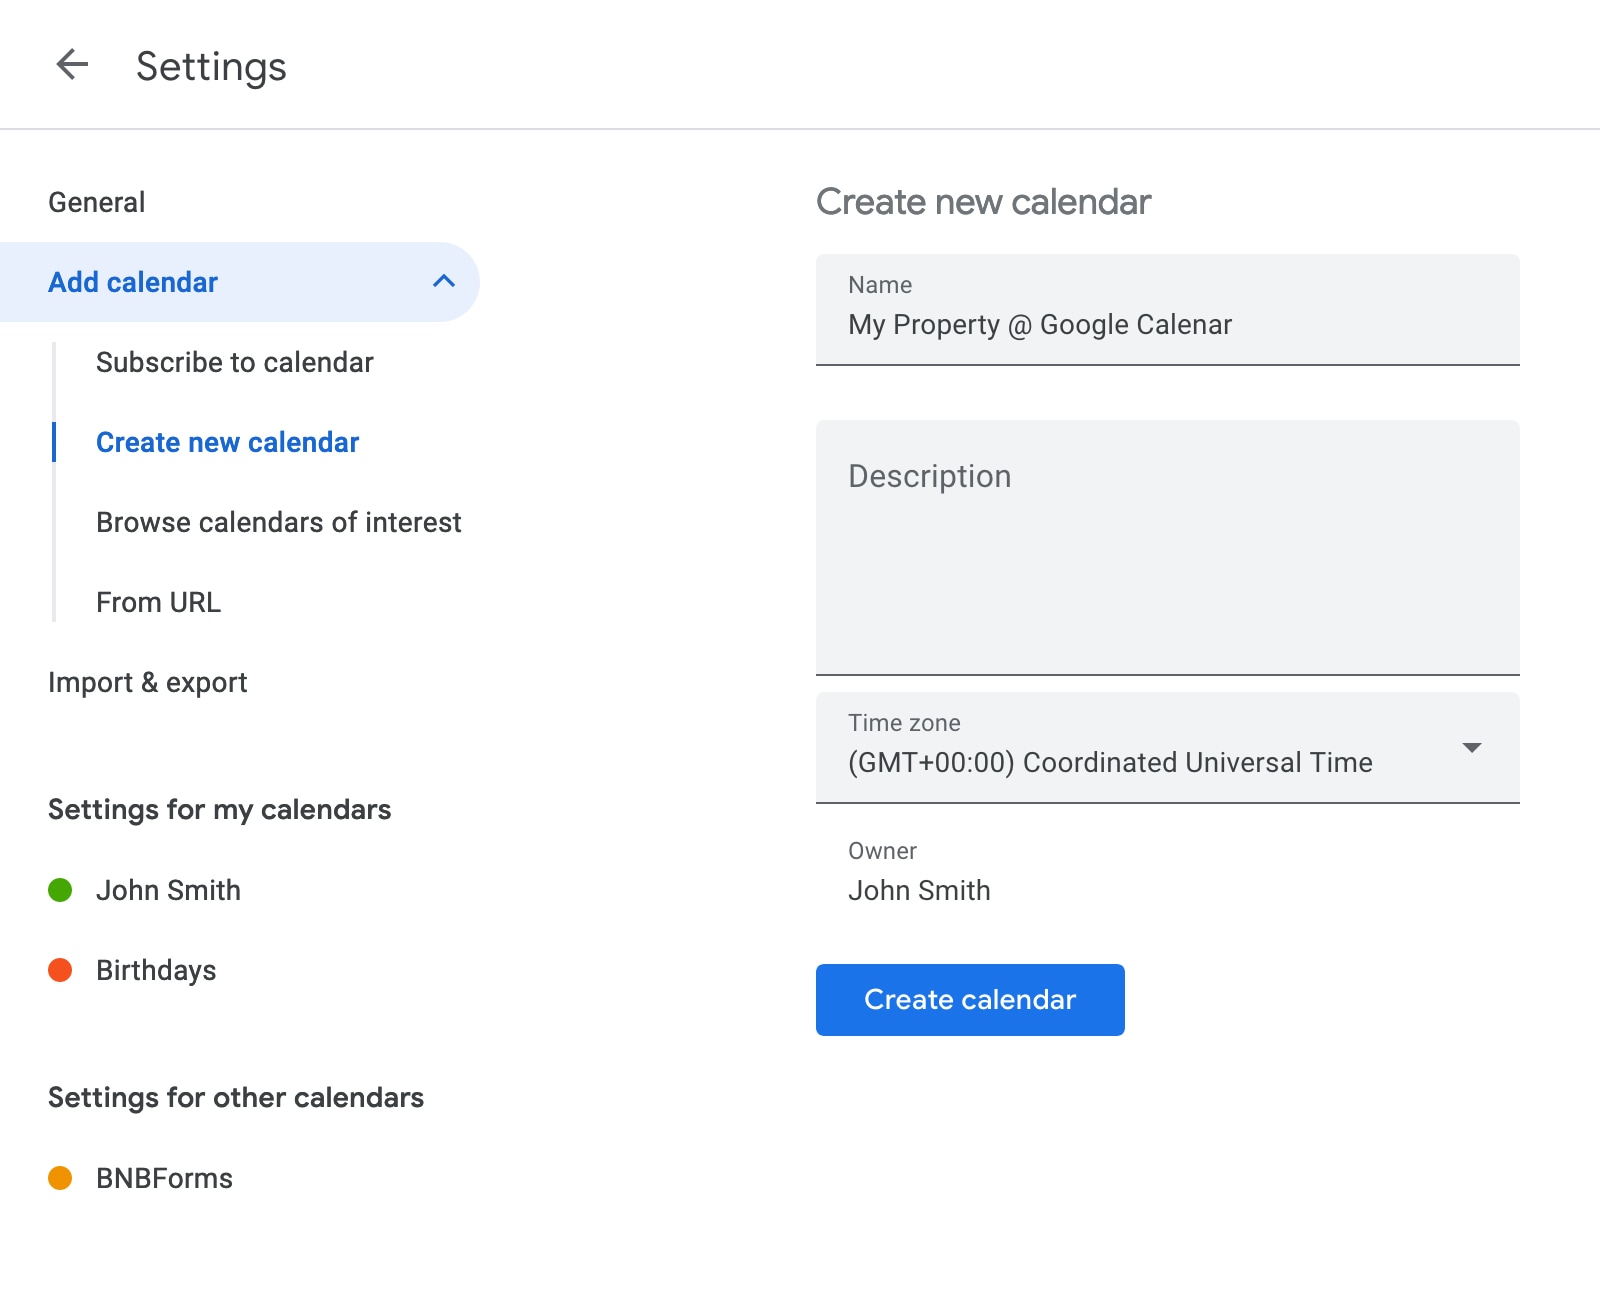
9. In the Settings menu, navigate to Add calendar > Create new calendar.
Give it a name, choose the appropriate time zone, and then click the ‘Create calendar’ button.
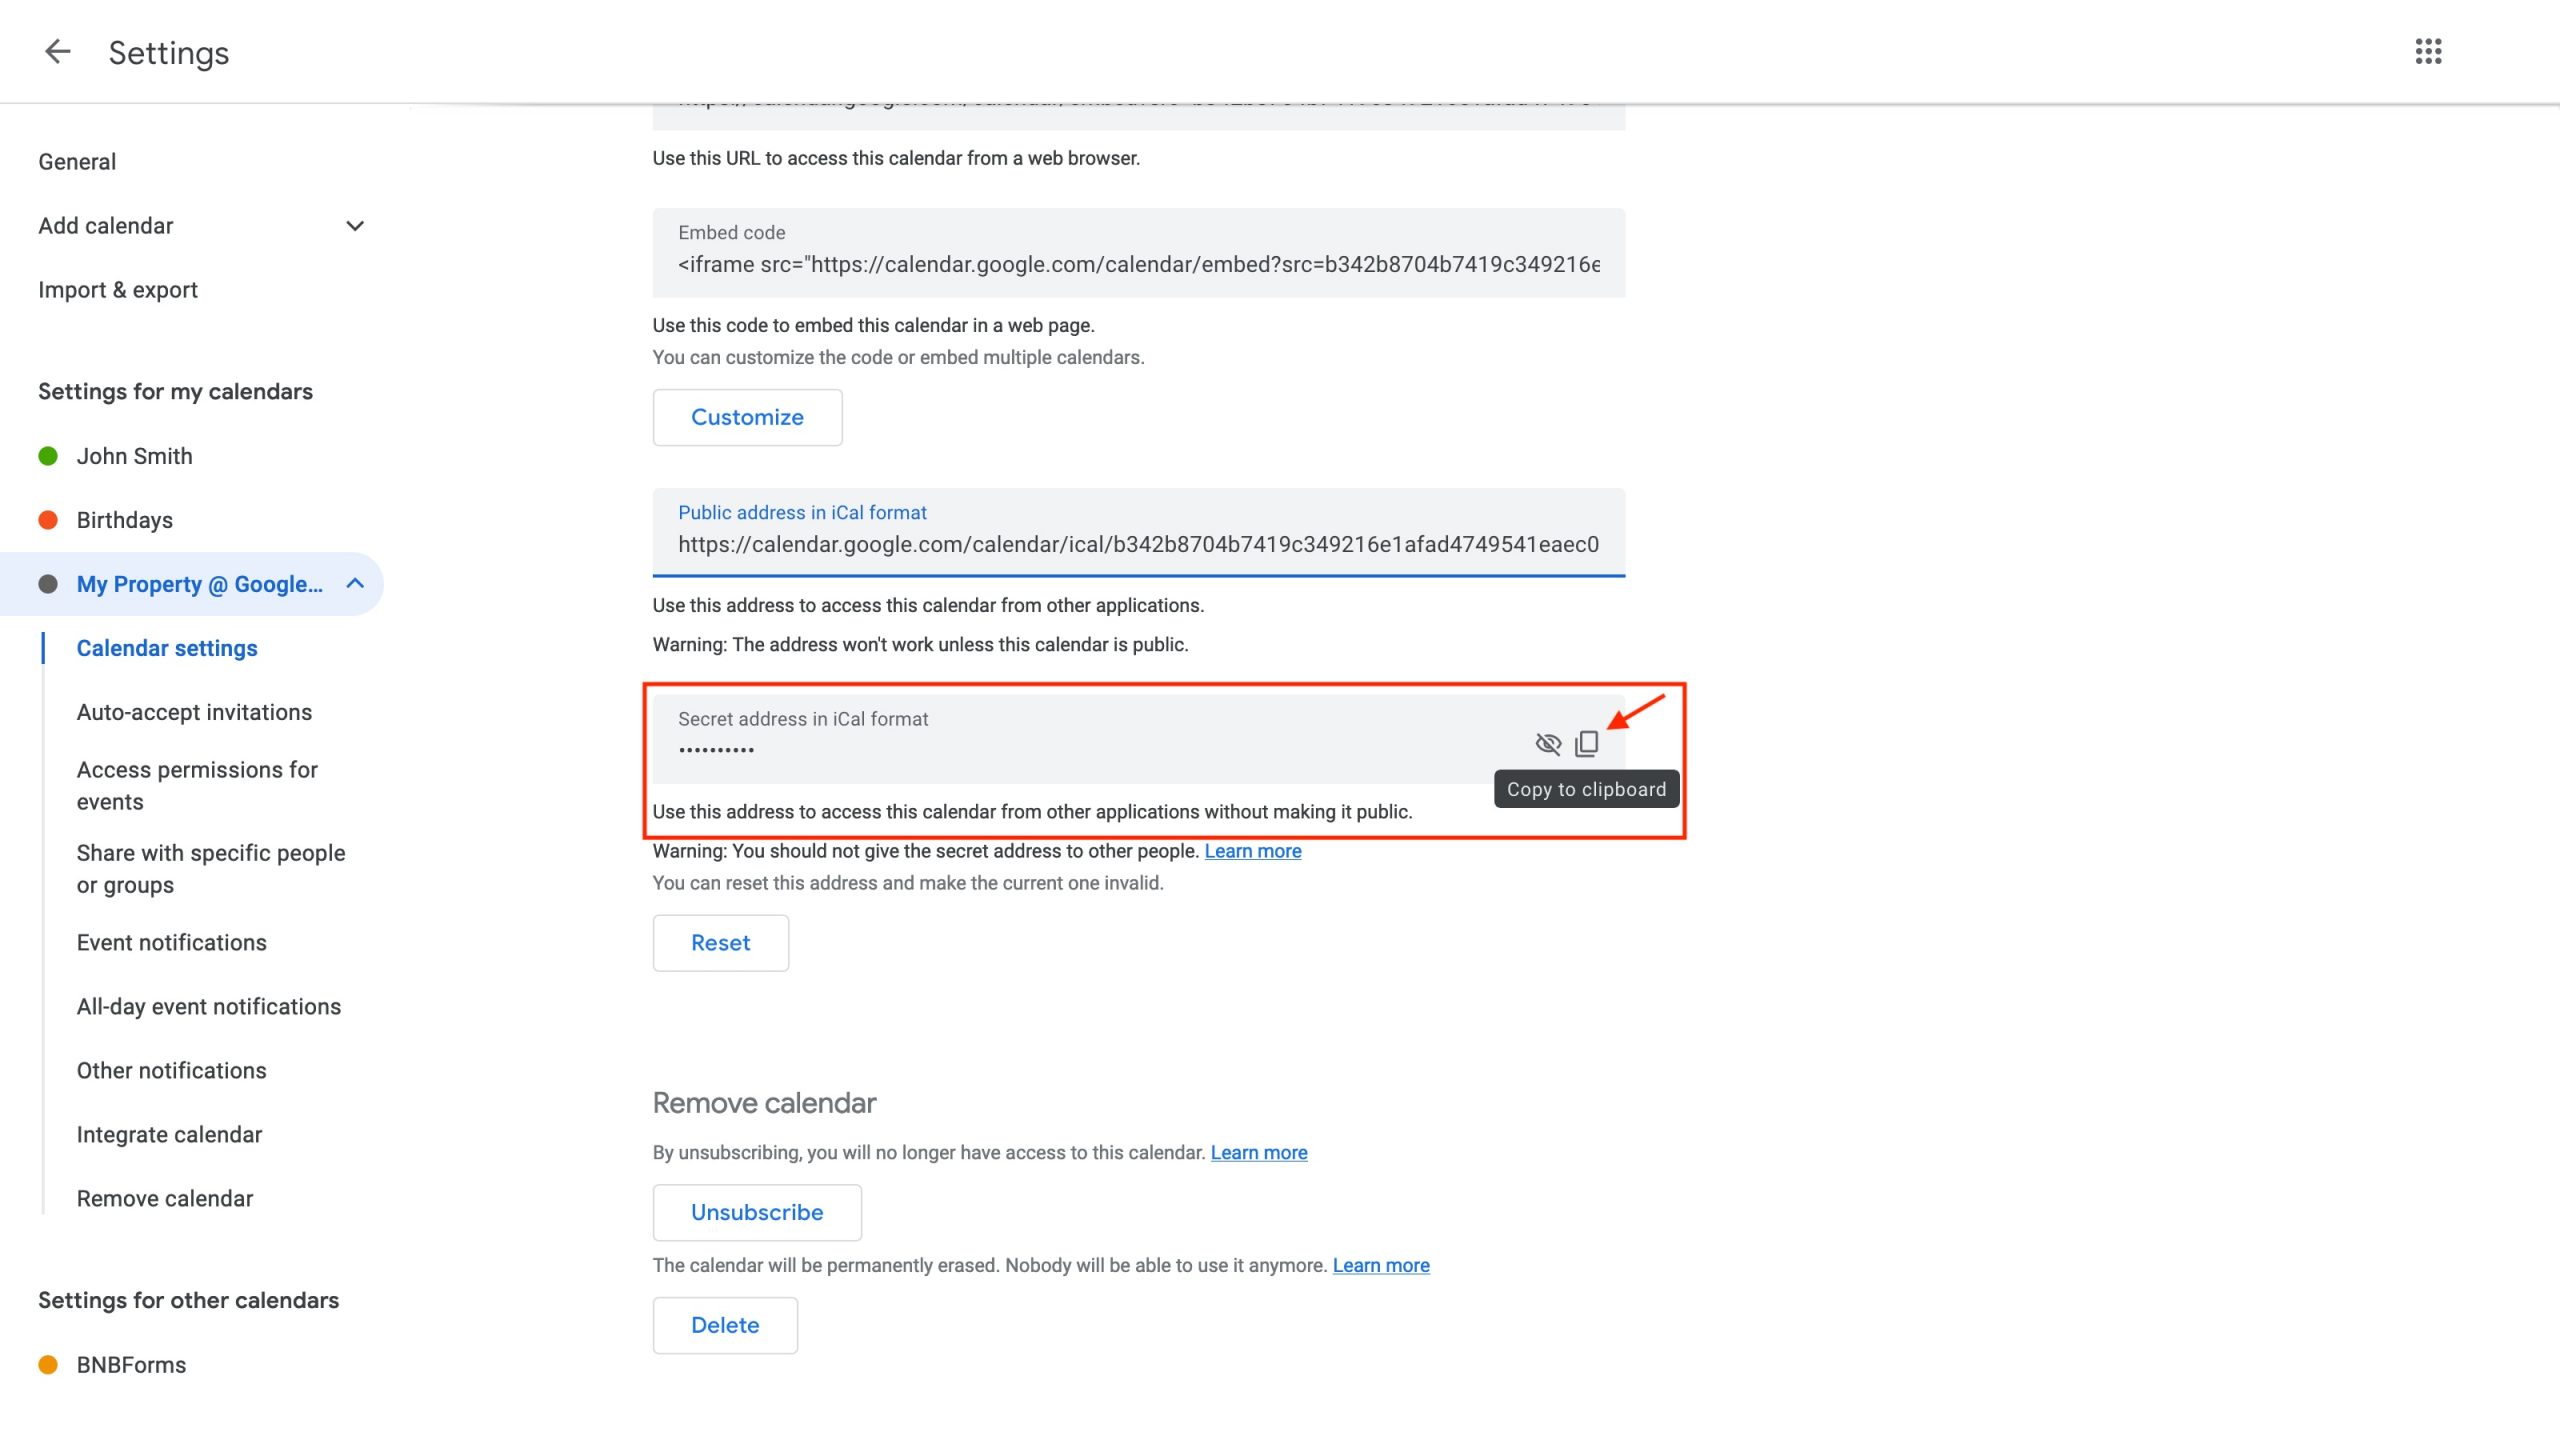
10. Choose the calendar, scroll to the bottom of the page, and copy the Secret address.
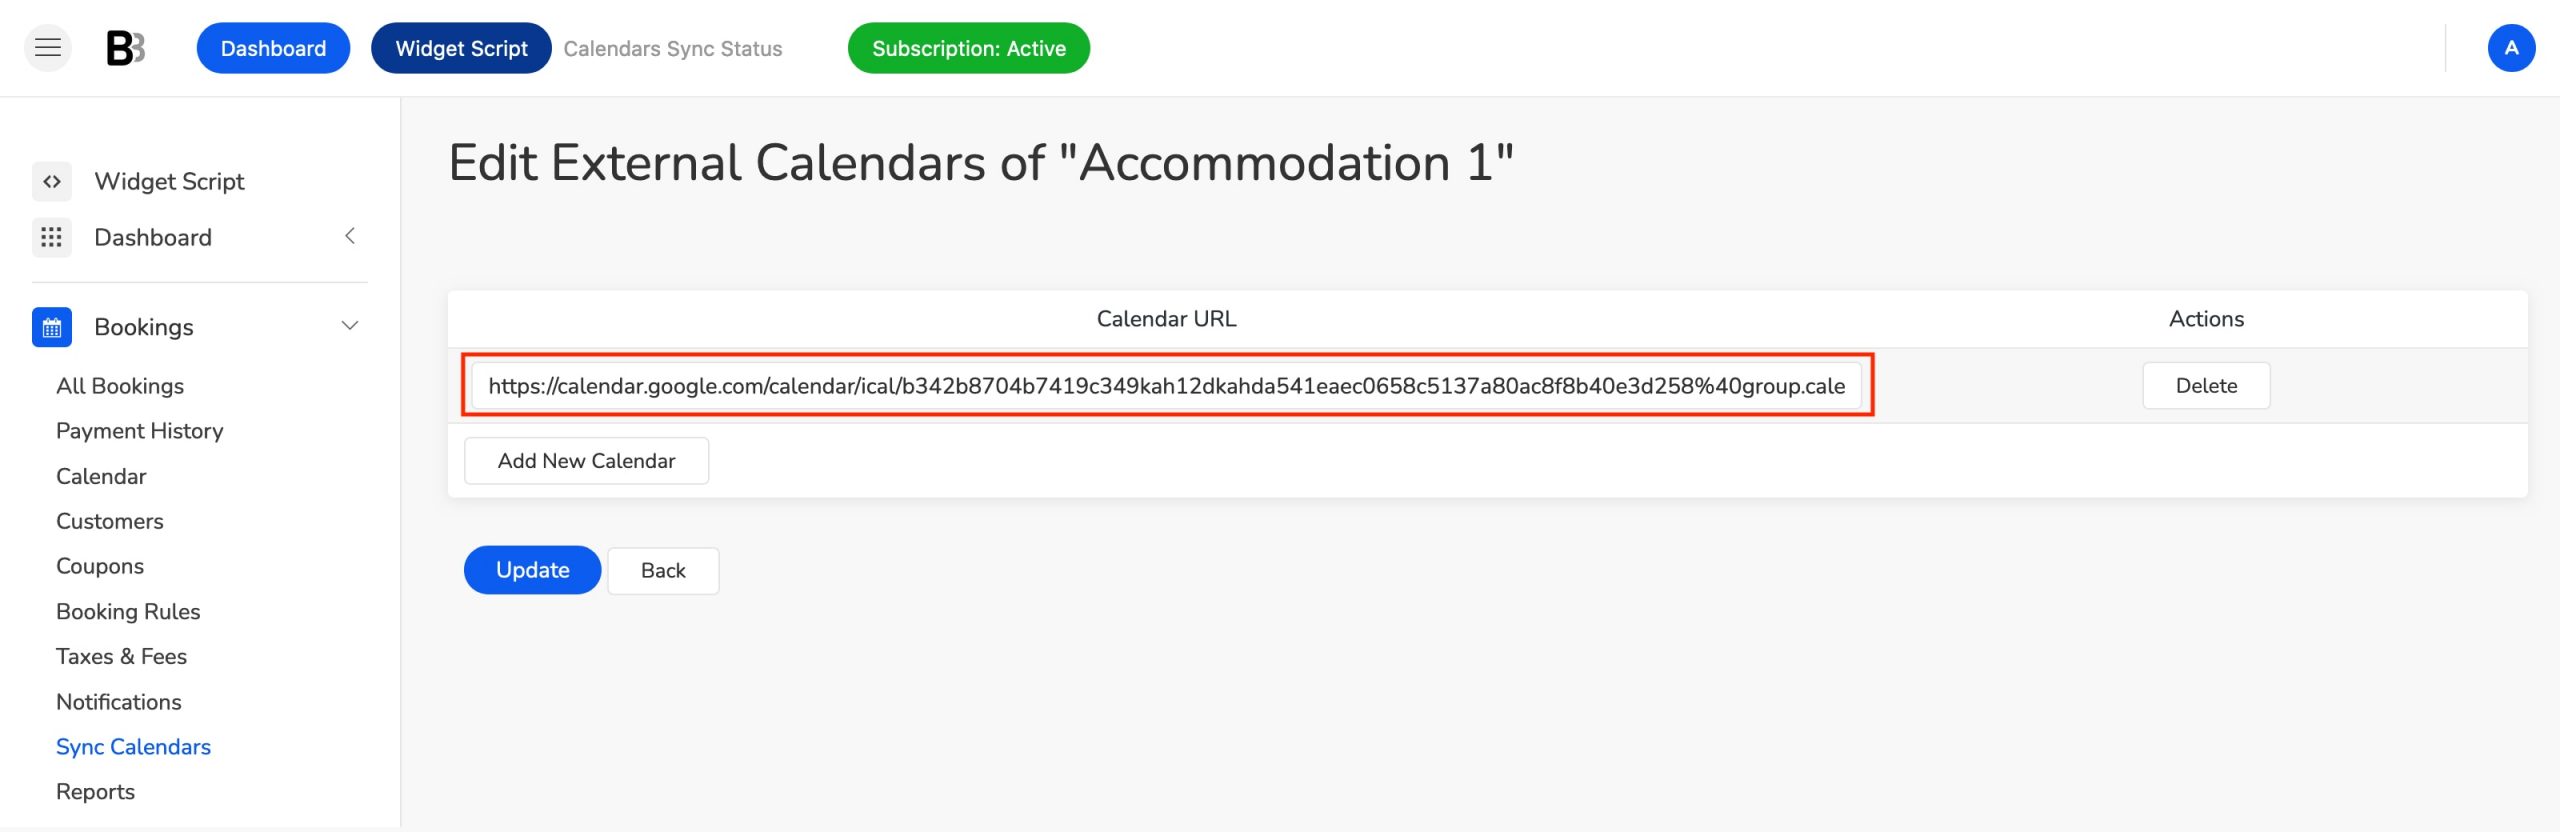
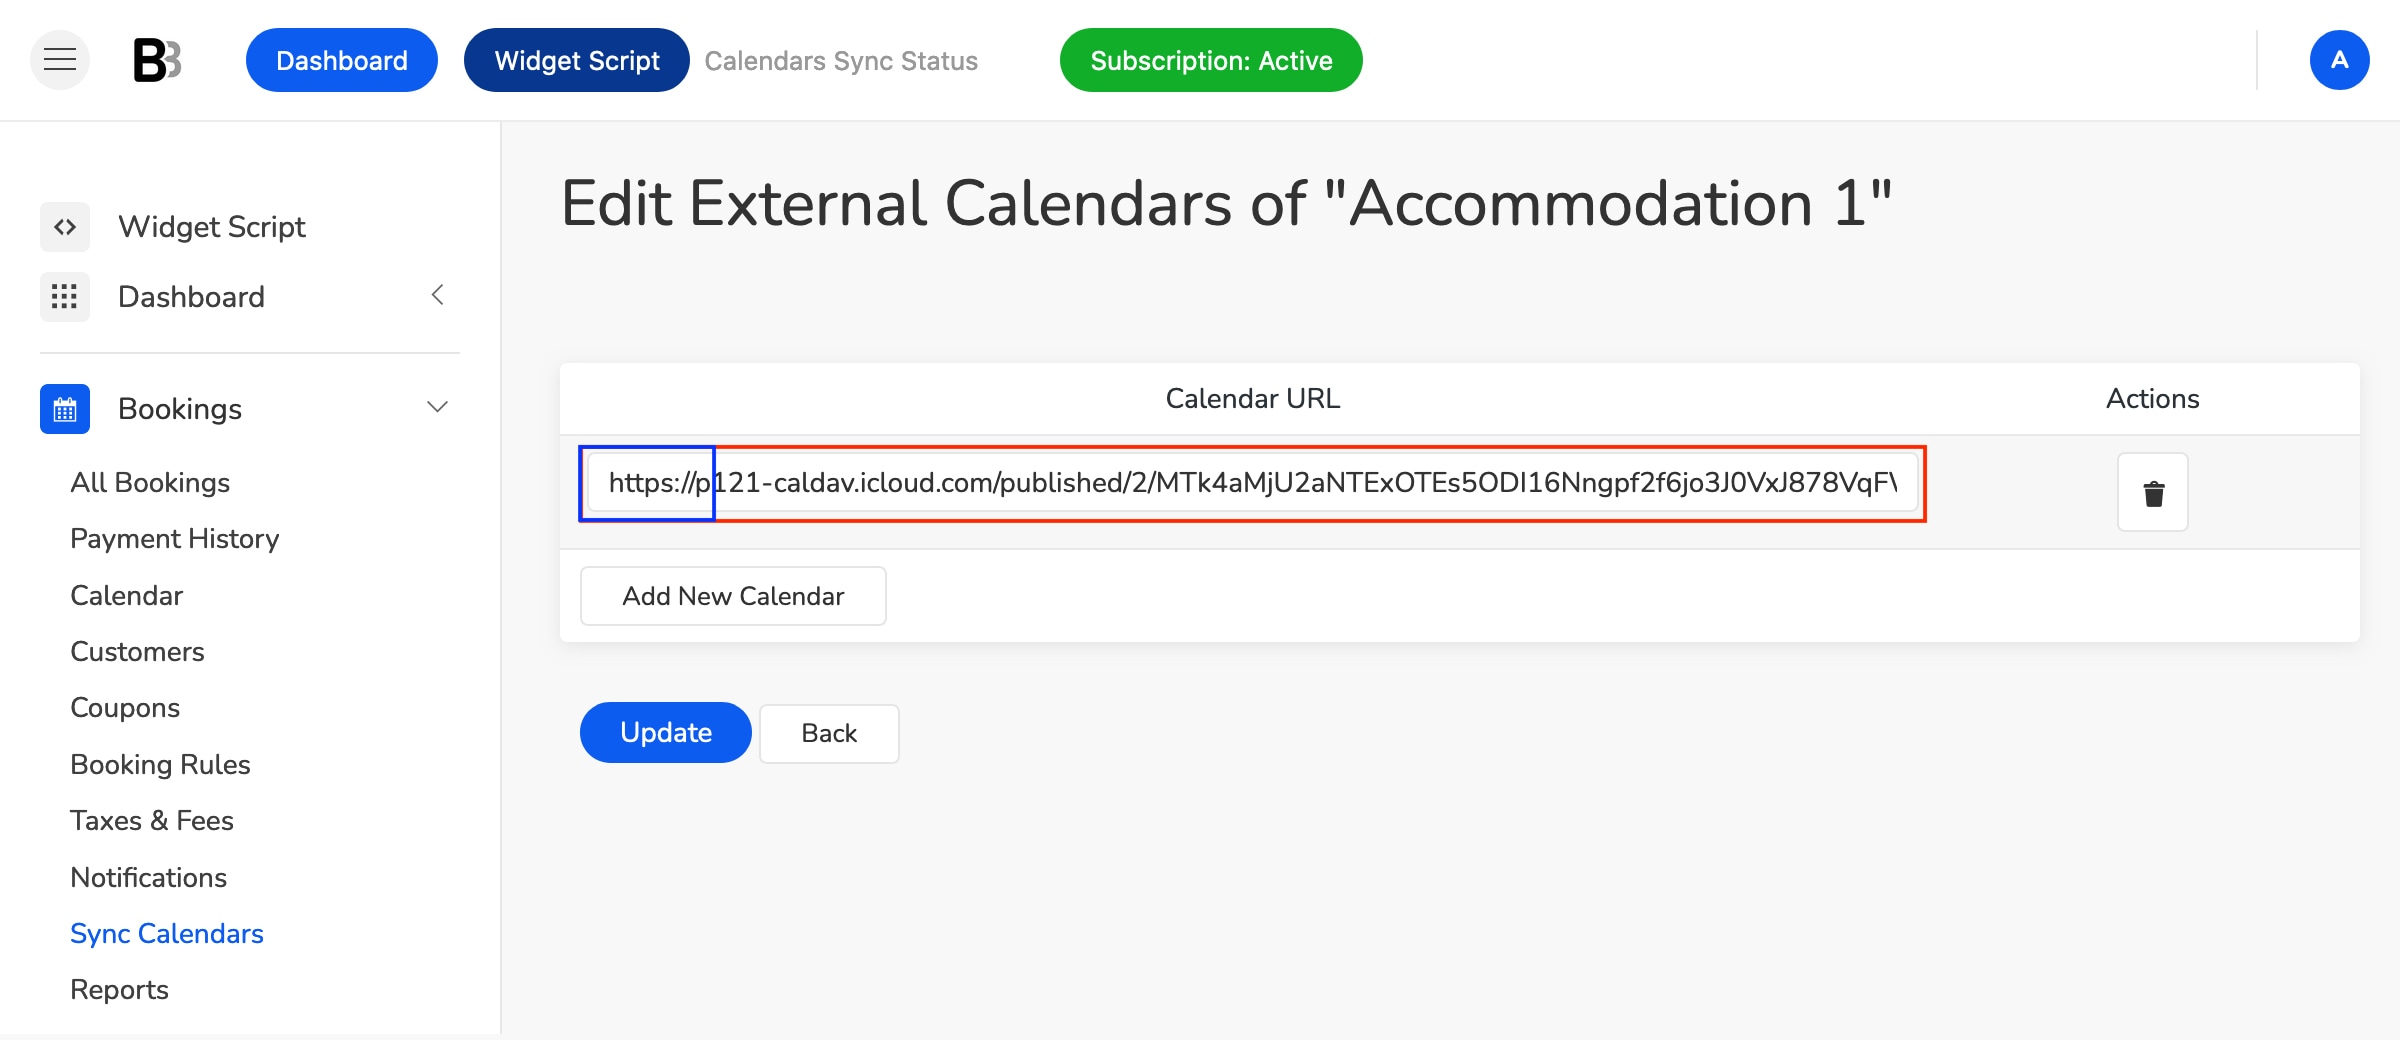
11. Navigate to BNBForms Dashboard > Bookings > Sync Calendars, and click the ‘Edit button’ under your property.
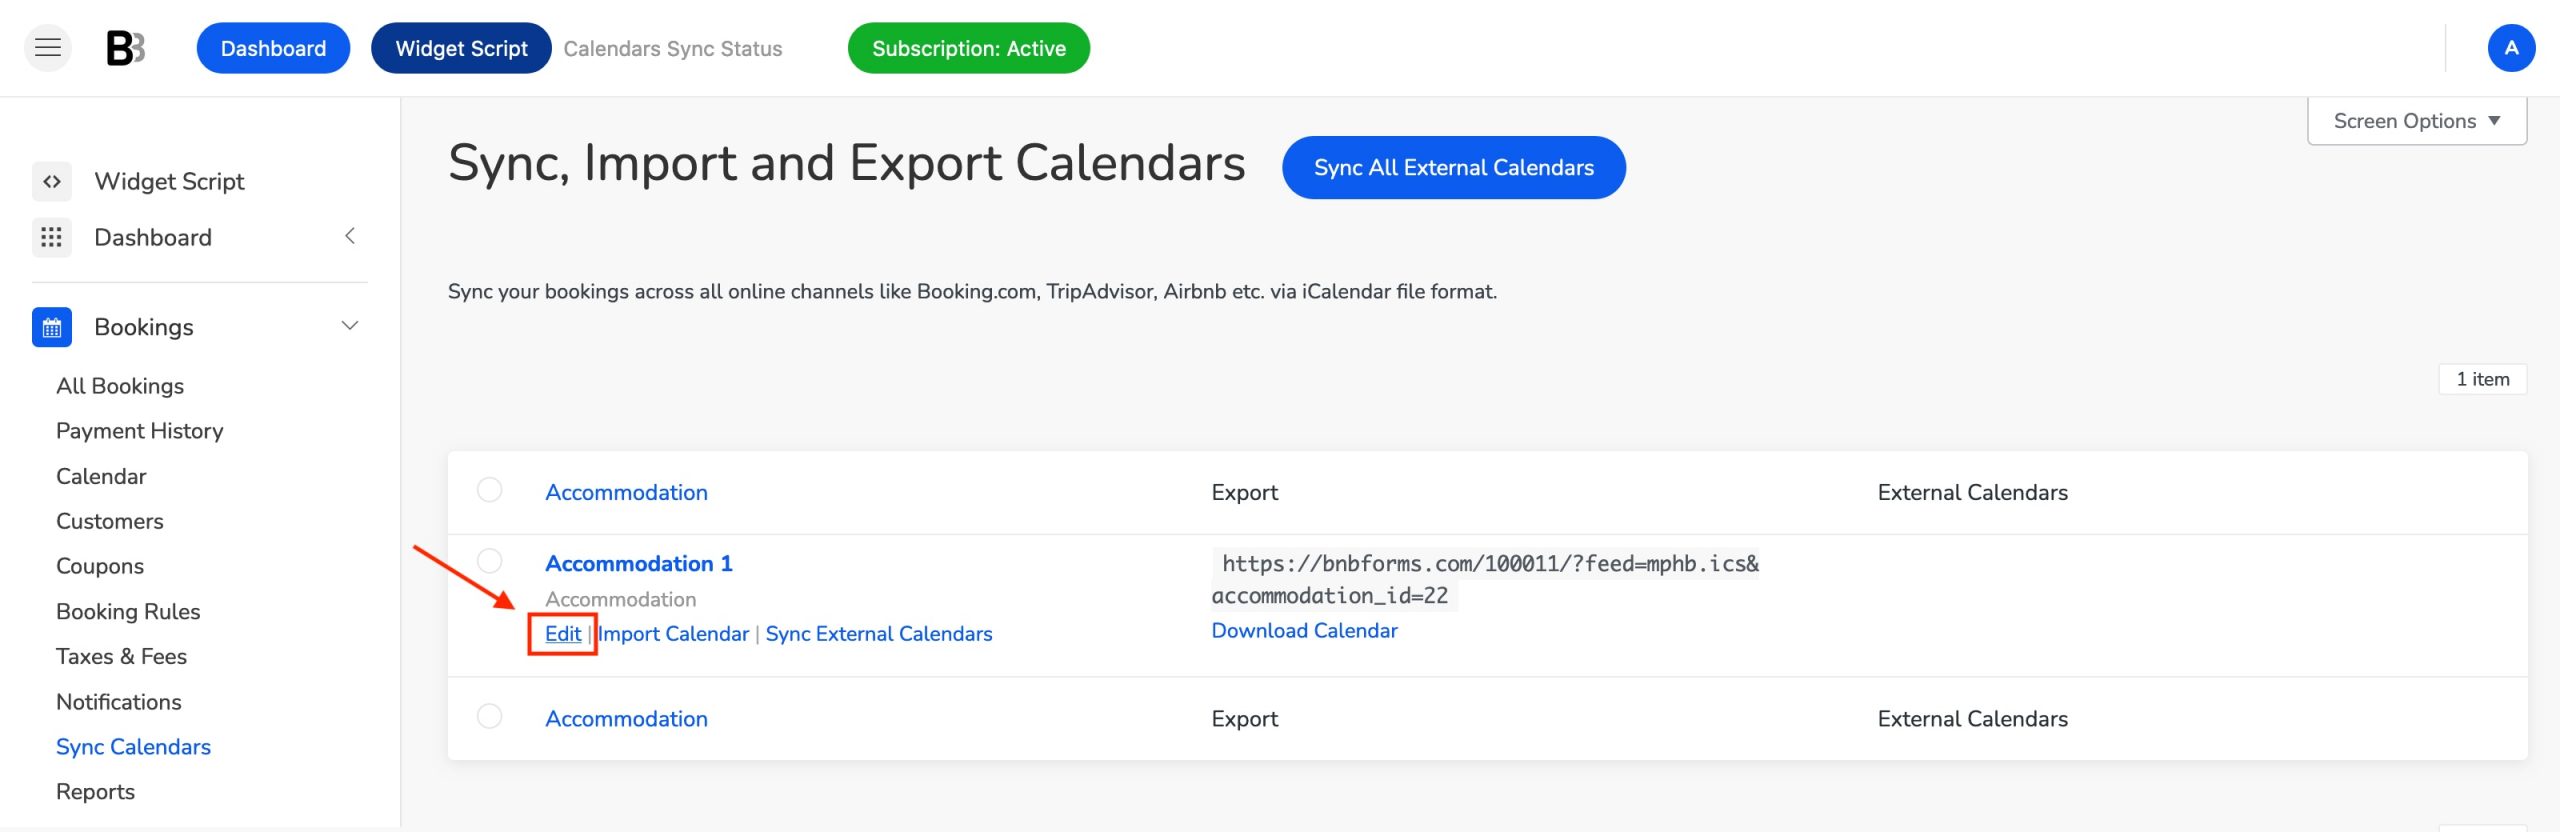
12. Click the ‘Add New Calendar’ button and paste the Secret address of your Google calendar. Click the ‘Update’ button.
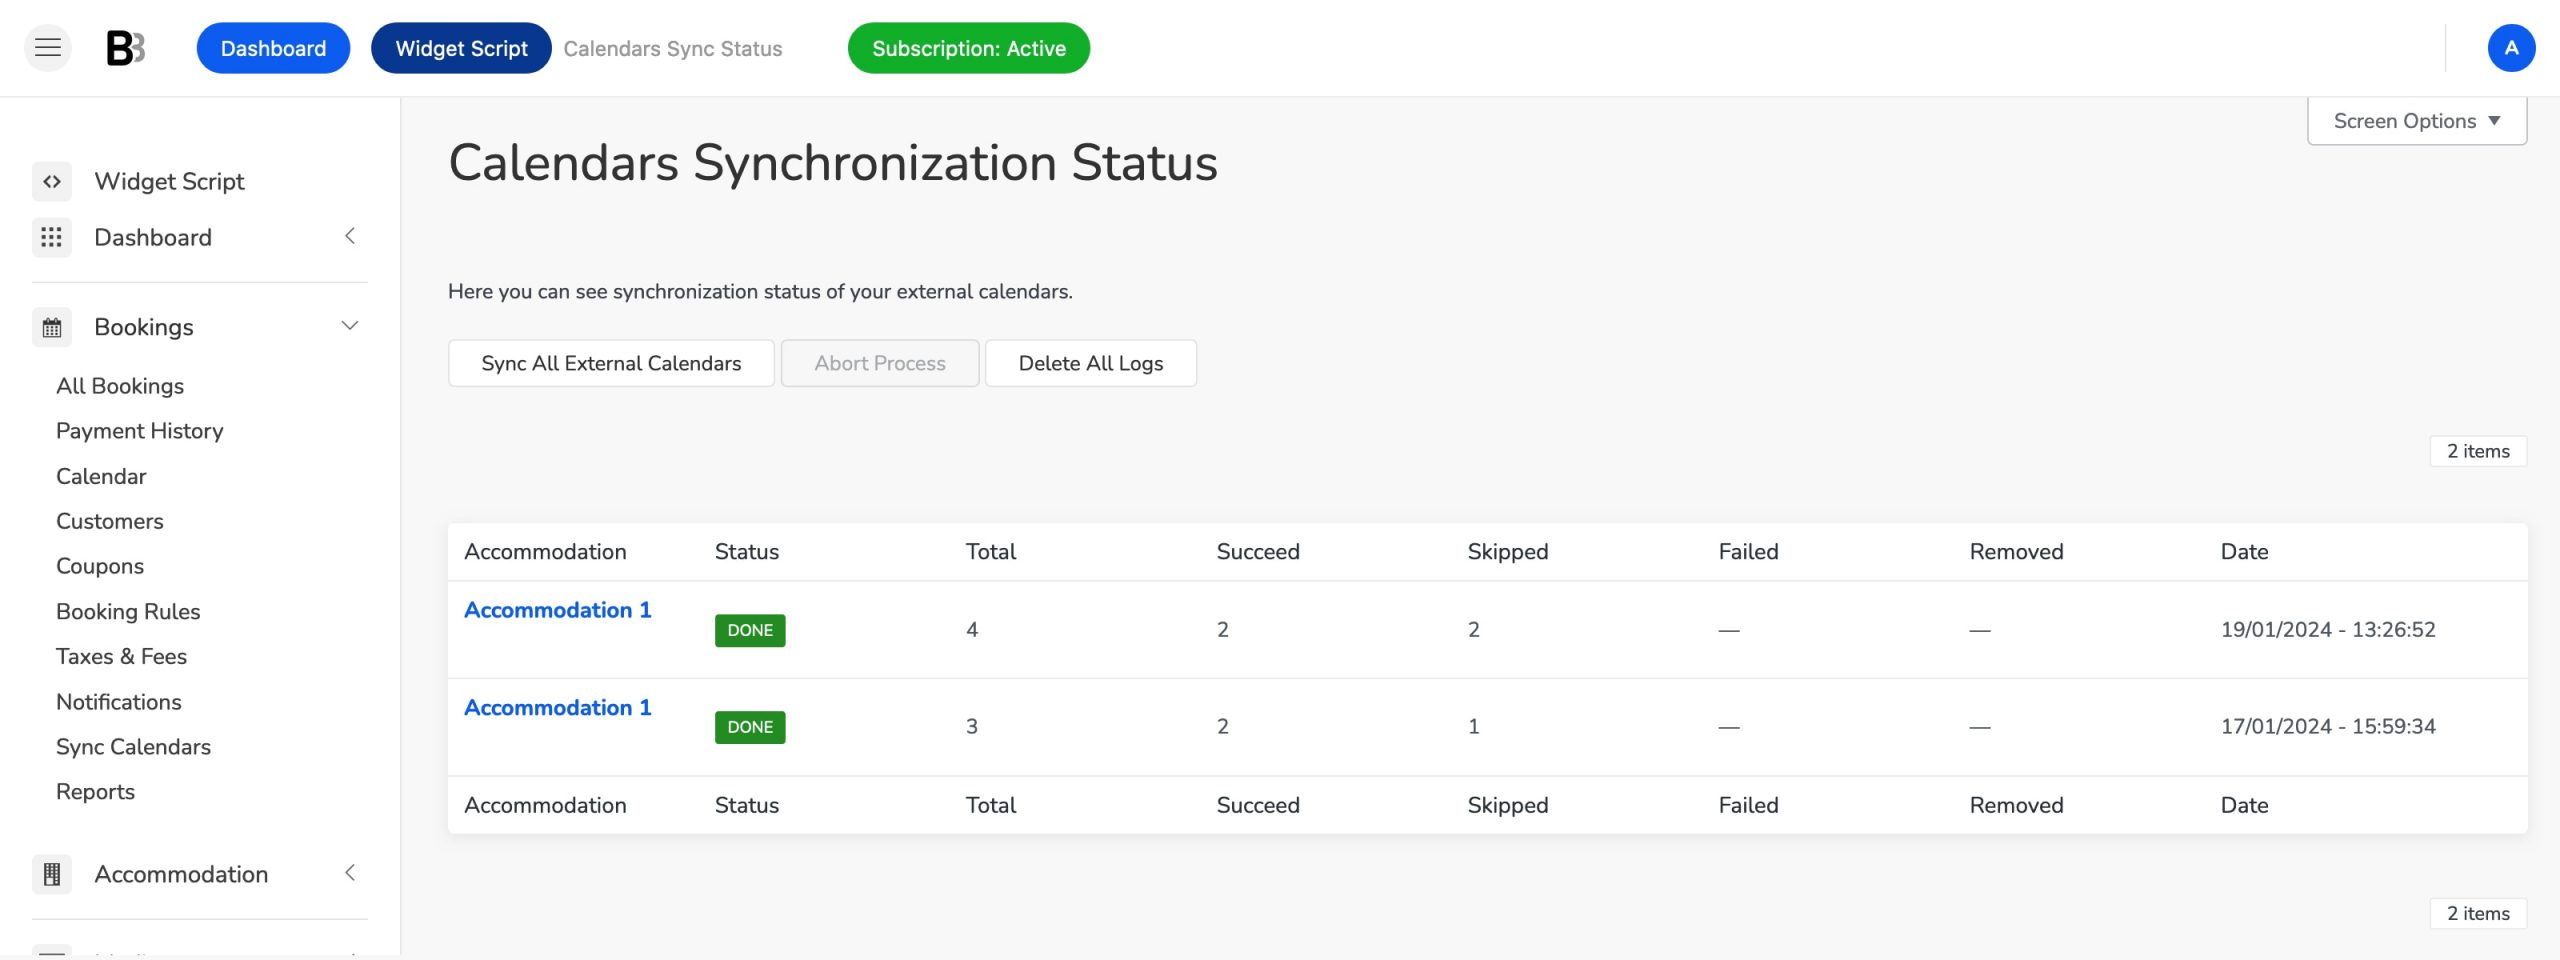
13. Navigate to Dashboard > Bookings > Sync Calendars and click the ‘Sync All External Calendars’ button.
After clicking, you will be redirected to the Calendars Synchronization Status page where you can view a log of the synchronization process that includes the number of created bookings.
Imported bookings can be accessed from both the Bookings and Calendar pages.
14. Enable automatic external calendars synchronization.
Navigate to Dashboard > Accommodation > Settings and scroll down to the Calendars Synchronization Scheduler section.
Select “Enable automatic external calendars synchronization” to enable automatic synchronization with external calendars.
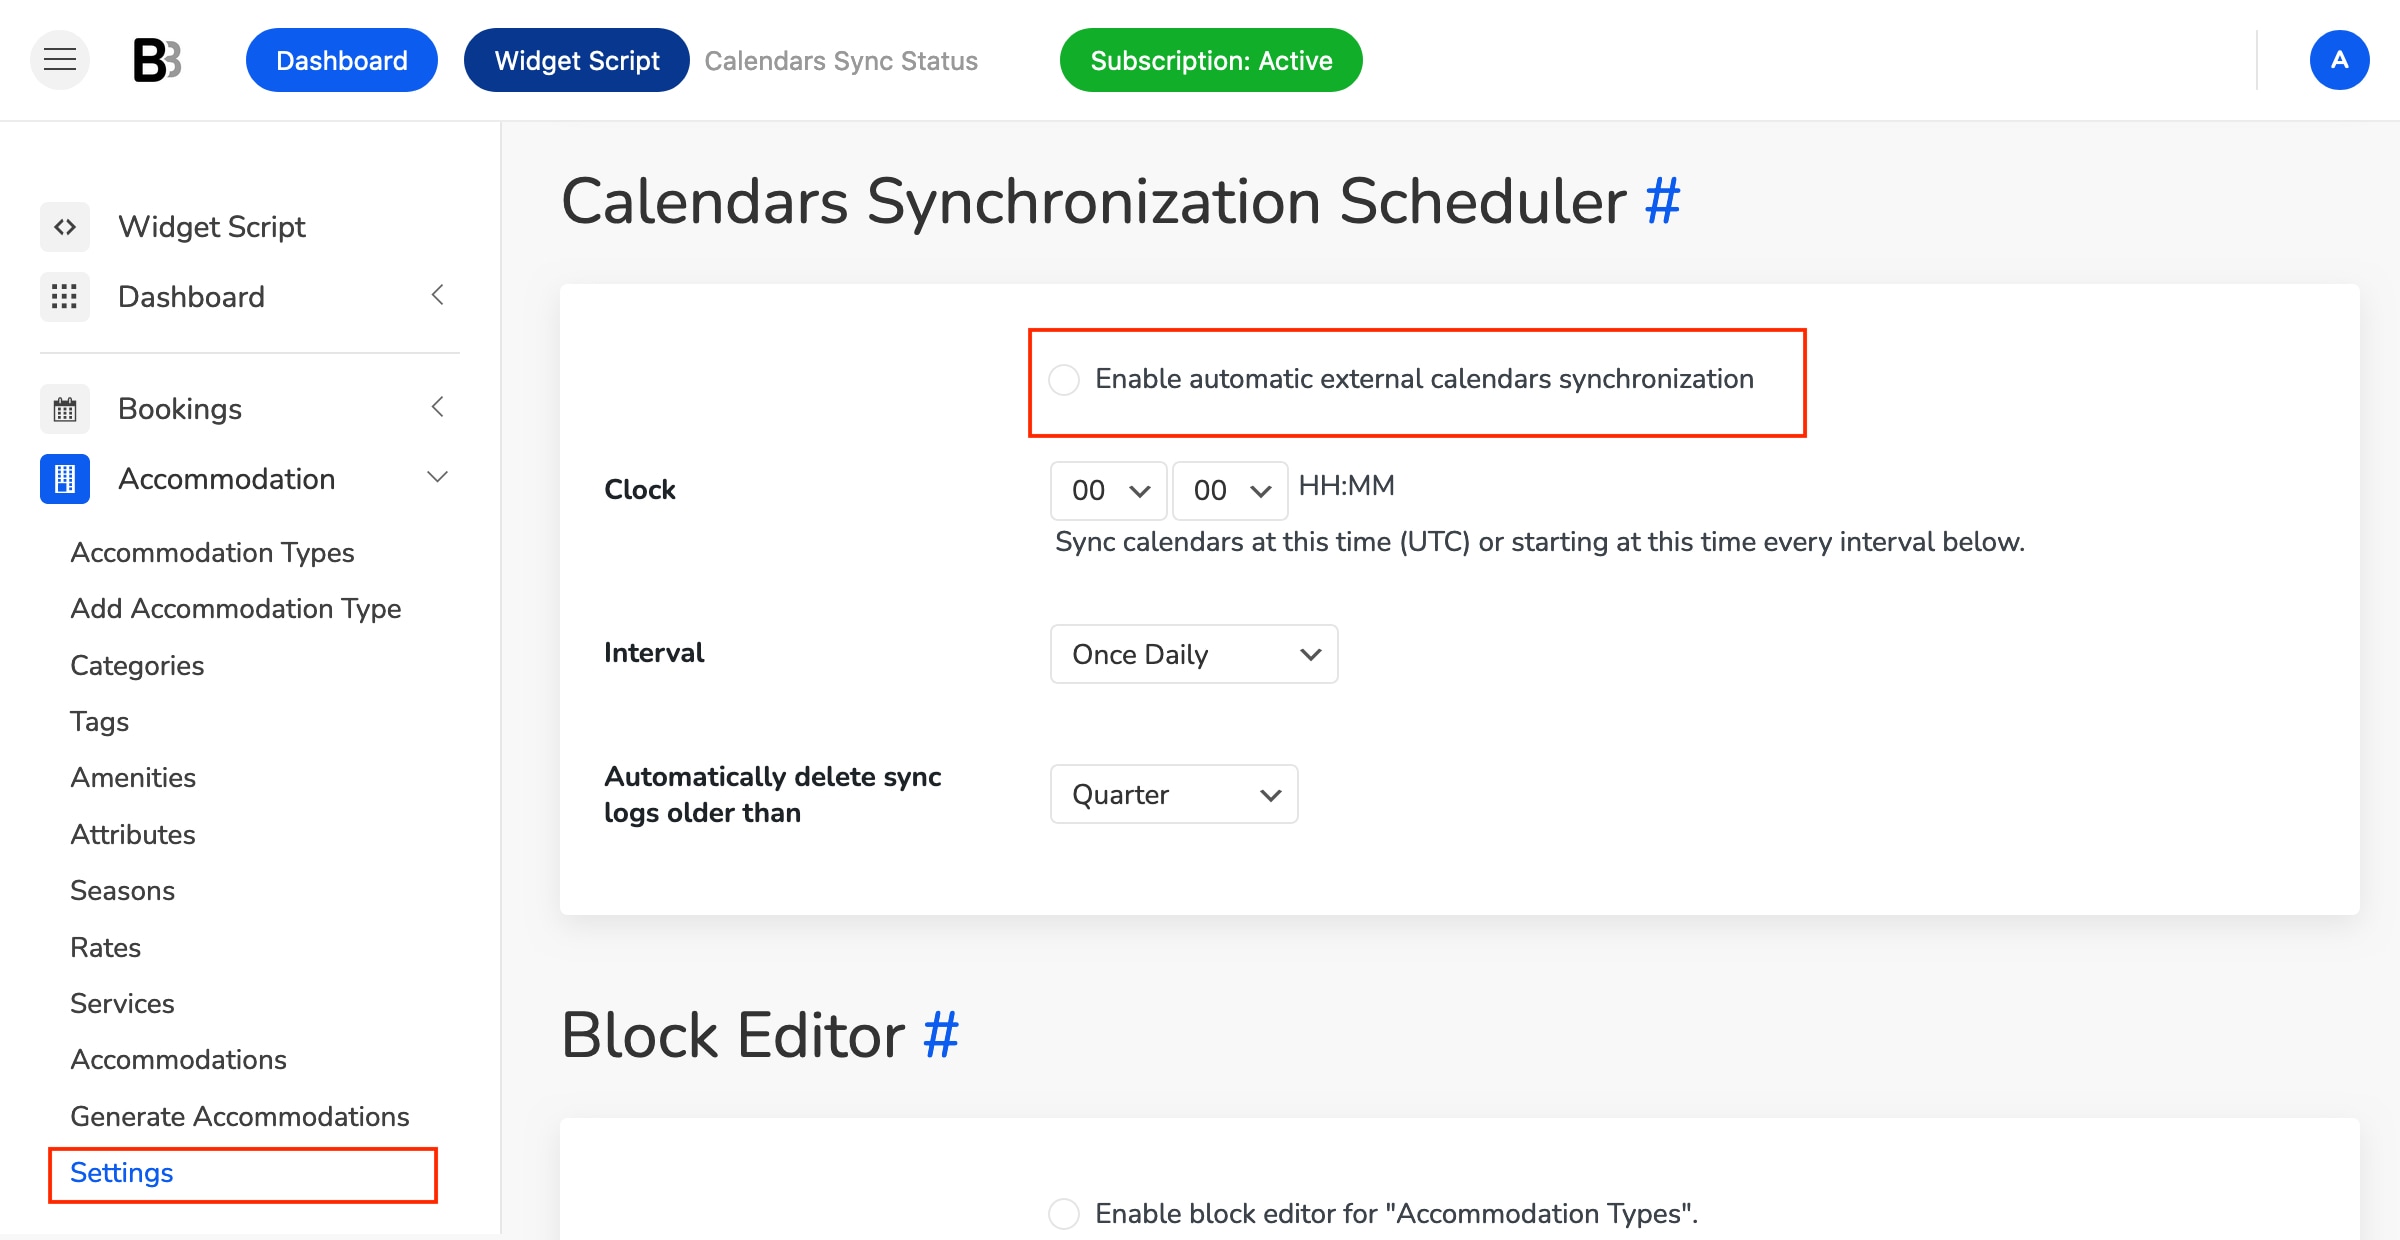
This option enables your BNBForms account to load external calendars according to a set schedule. However, this option doesn’t control how frequently external platforms will load calendars from your BNBForms account.
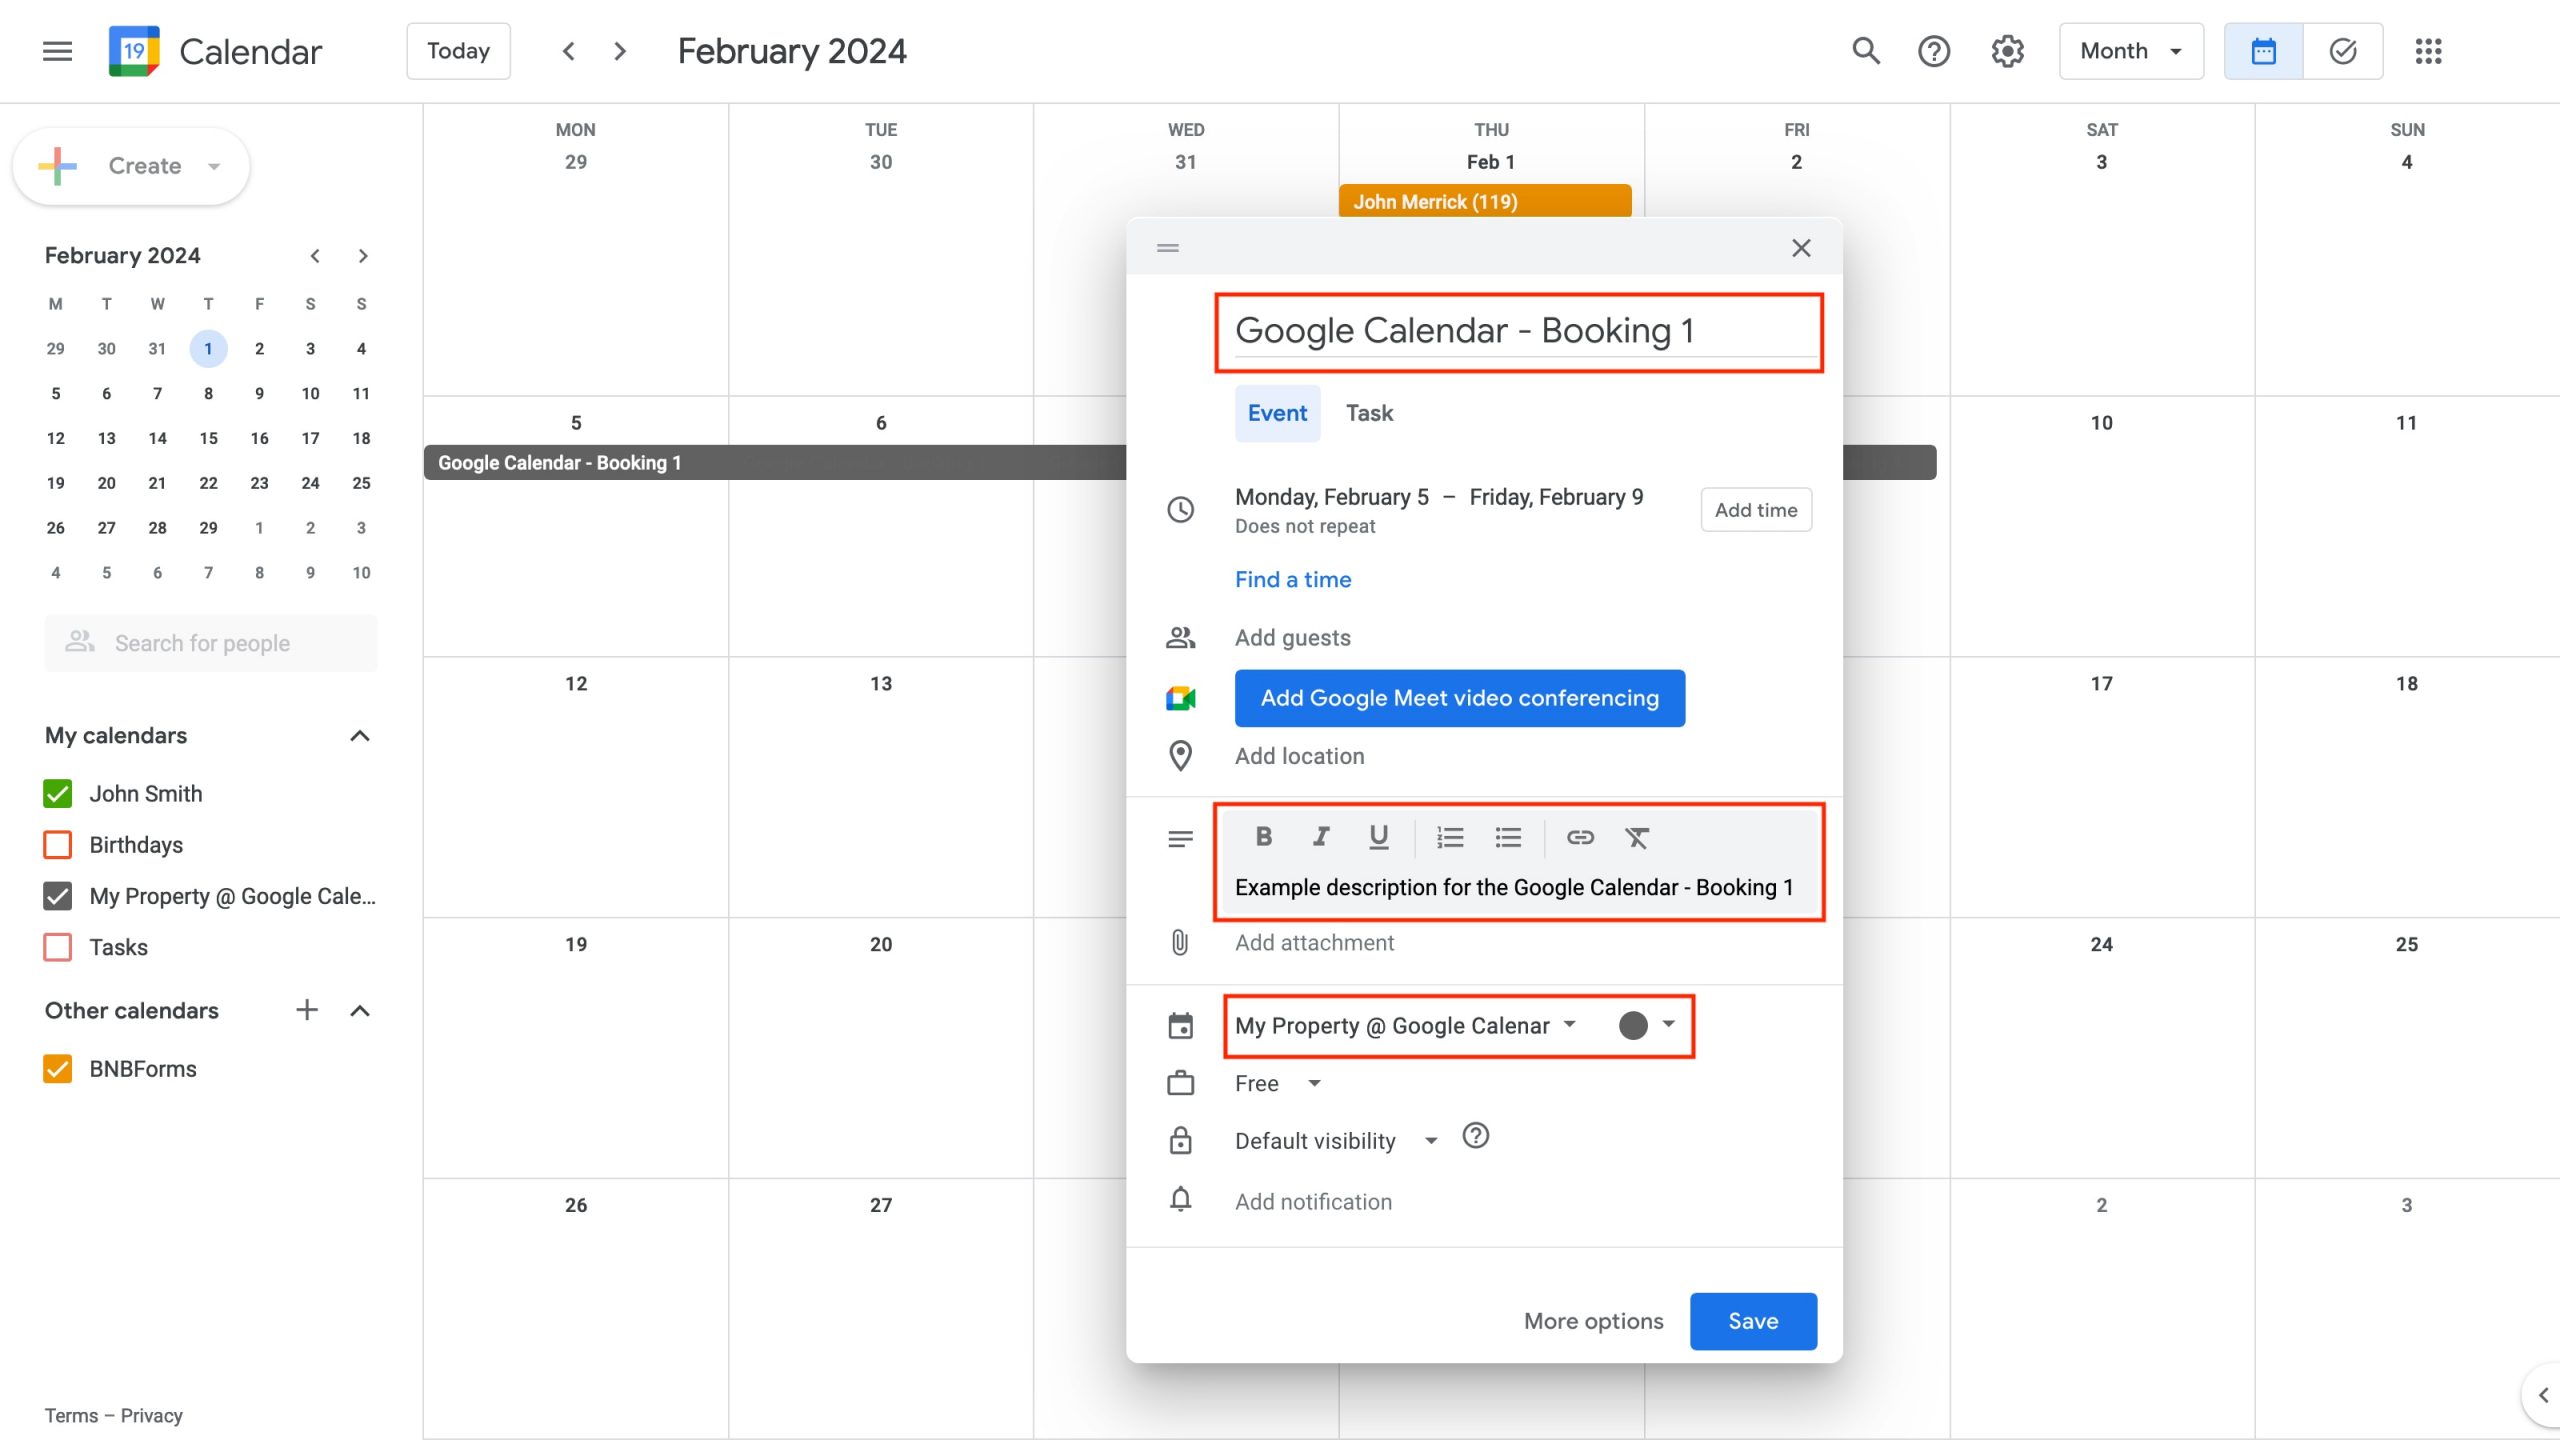
15. Create a booking or block time in your Google Calendar.
In Google Calendar, switch to the Month view and select the dates you would like to mark as booked or blocked.
In the opened popup, add the title, description and choose a calendar associated with your property. We created this calendar earlier in this tutorial. Click ‘Save’.
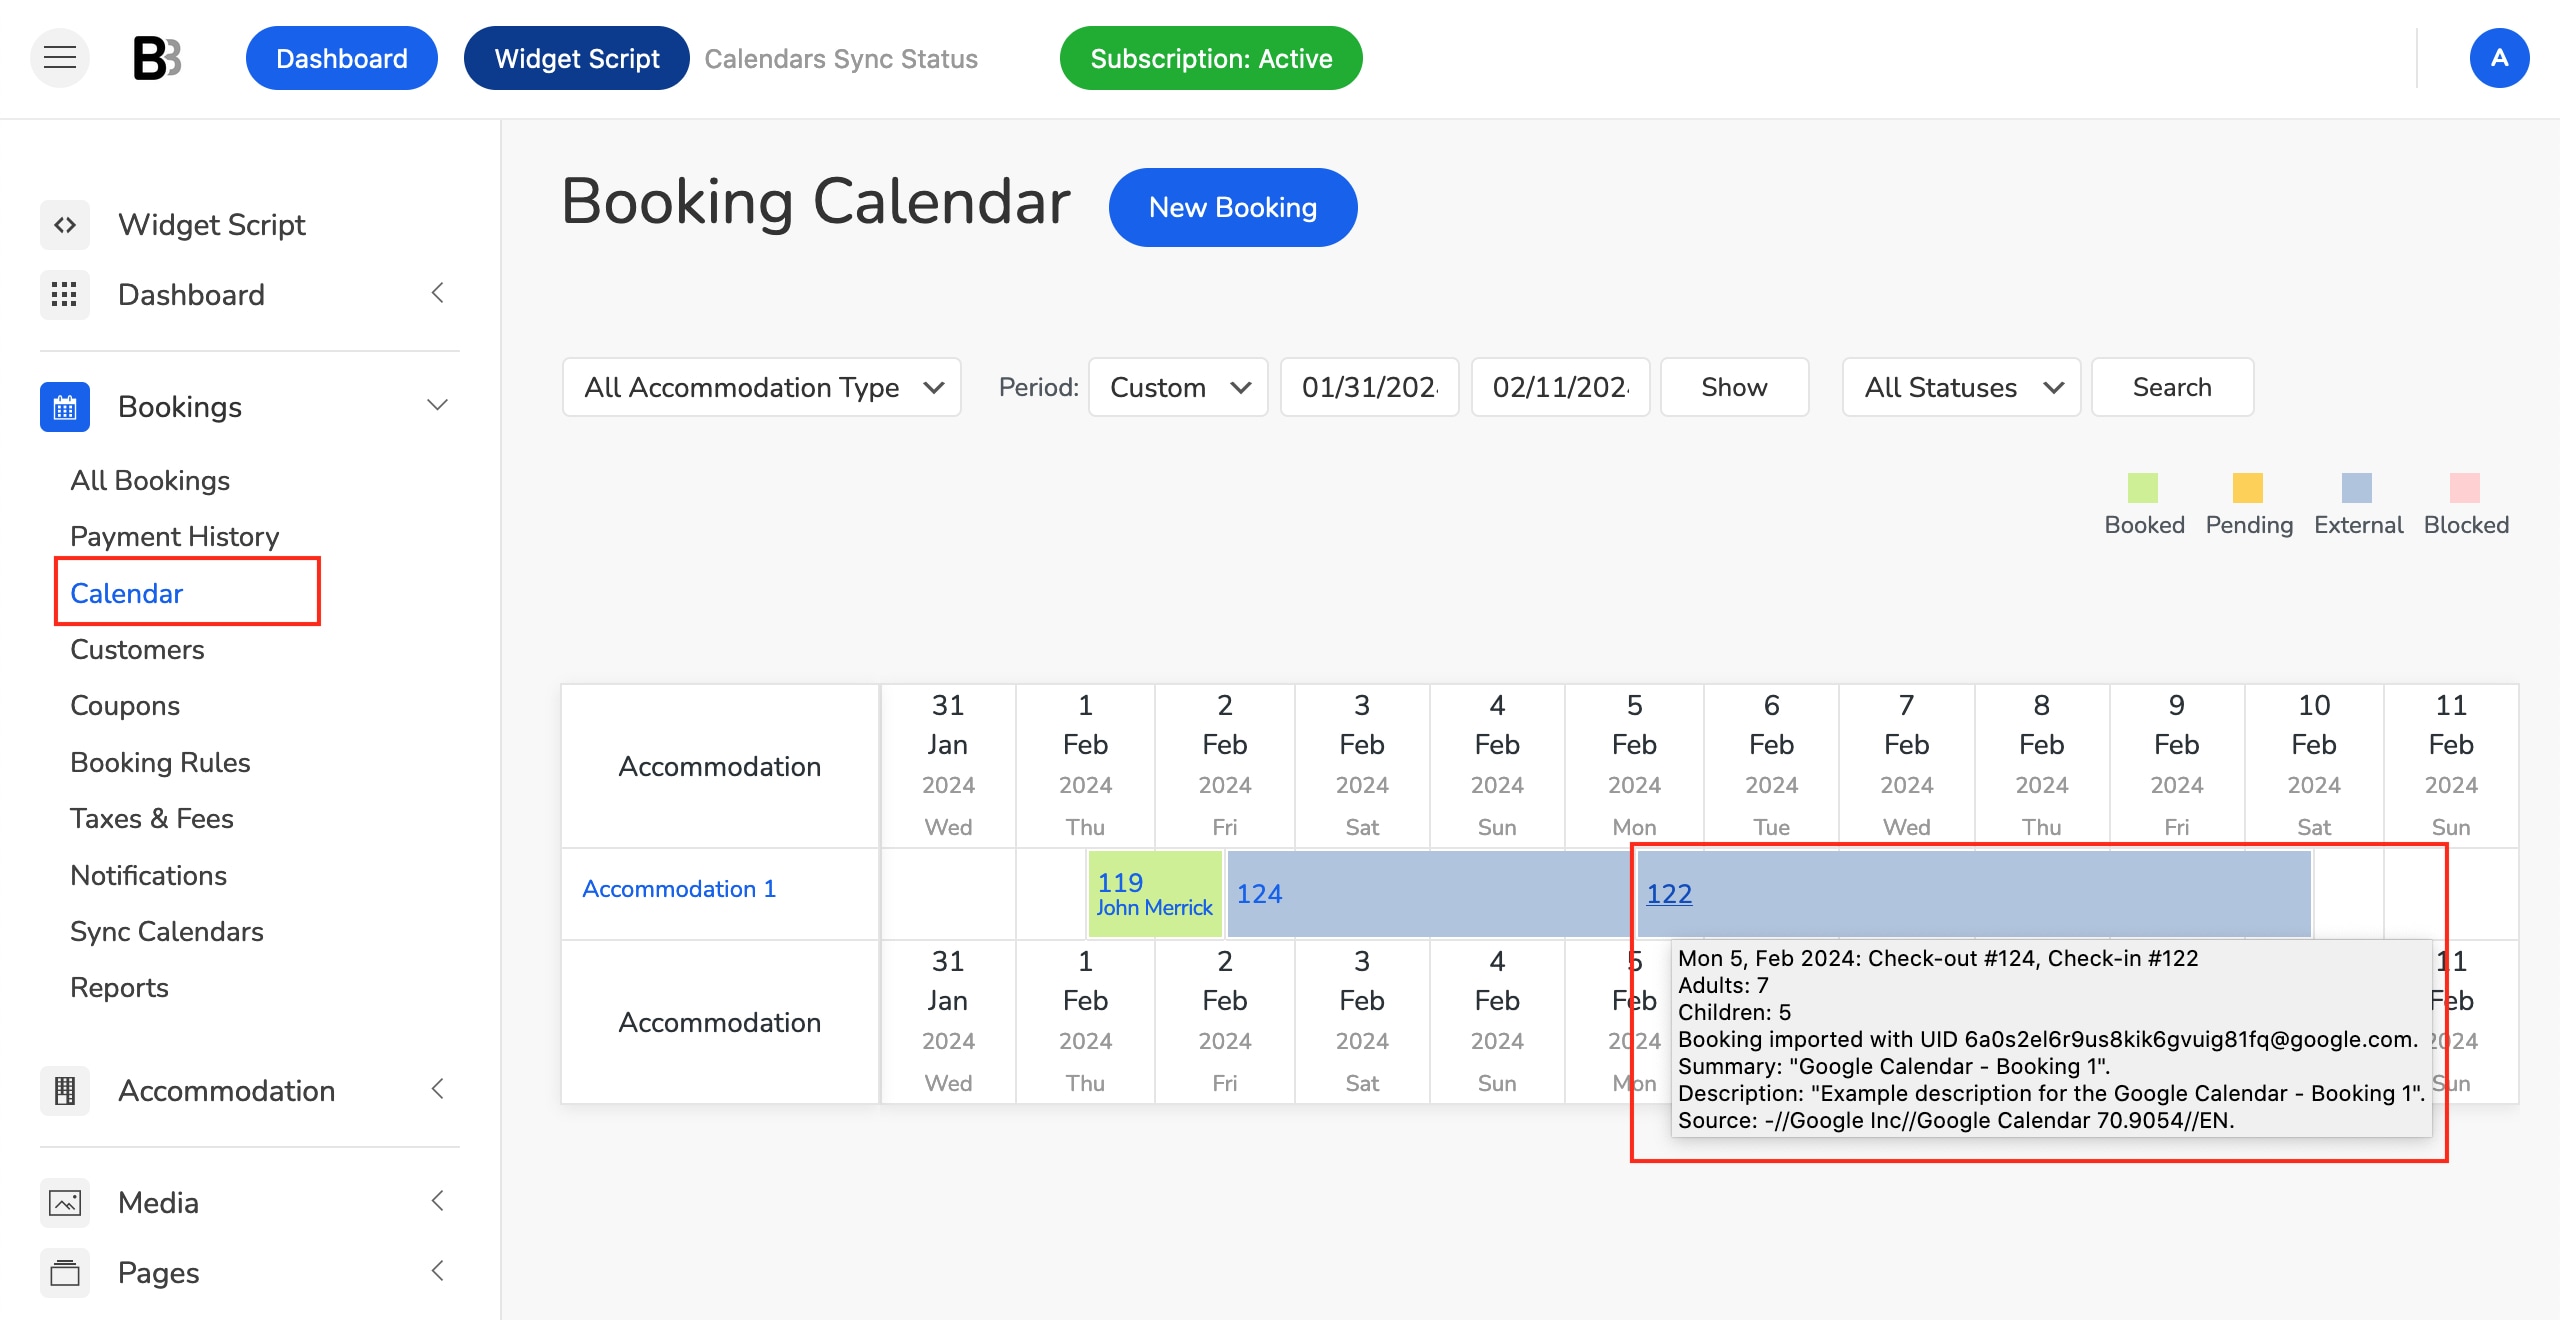
If you’ve enabled automatic calendar synchronization, you can either wait for the automatic synchronization process or navigate to Dashboard > Bookings > Sync Calendars and click the ‘Sync All External Calendars’ button to synchronize immediately.
Navigate to Dashboard > Bookings > Calendar. If synchronization was successful, you will find a new booking imported from your Google Calendar. Hover over or click on it to see details.
How to sync bookings with Apple Calendar
1. Locate your calendar URLs.
All calendar URLs associated with your rental properties can be found via Dashboard > Bookings > Sync Calendars.
2. Copy your calendar URL.
Copy your calendar URL located in the “Export” column.
3. Open Apple Calendar on your MacBook.
We’ll provide you with examples from Calendar version 11.0.
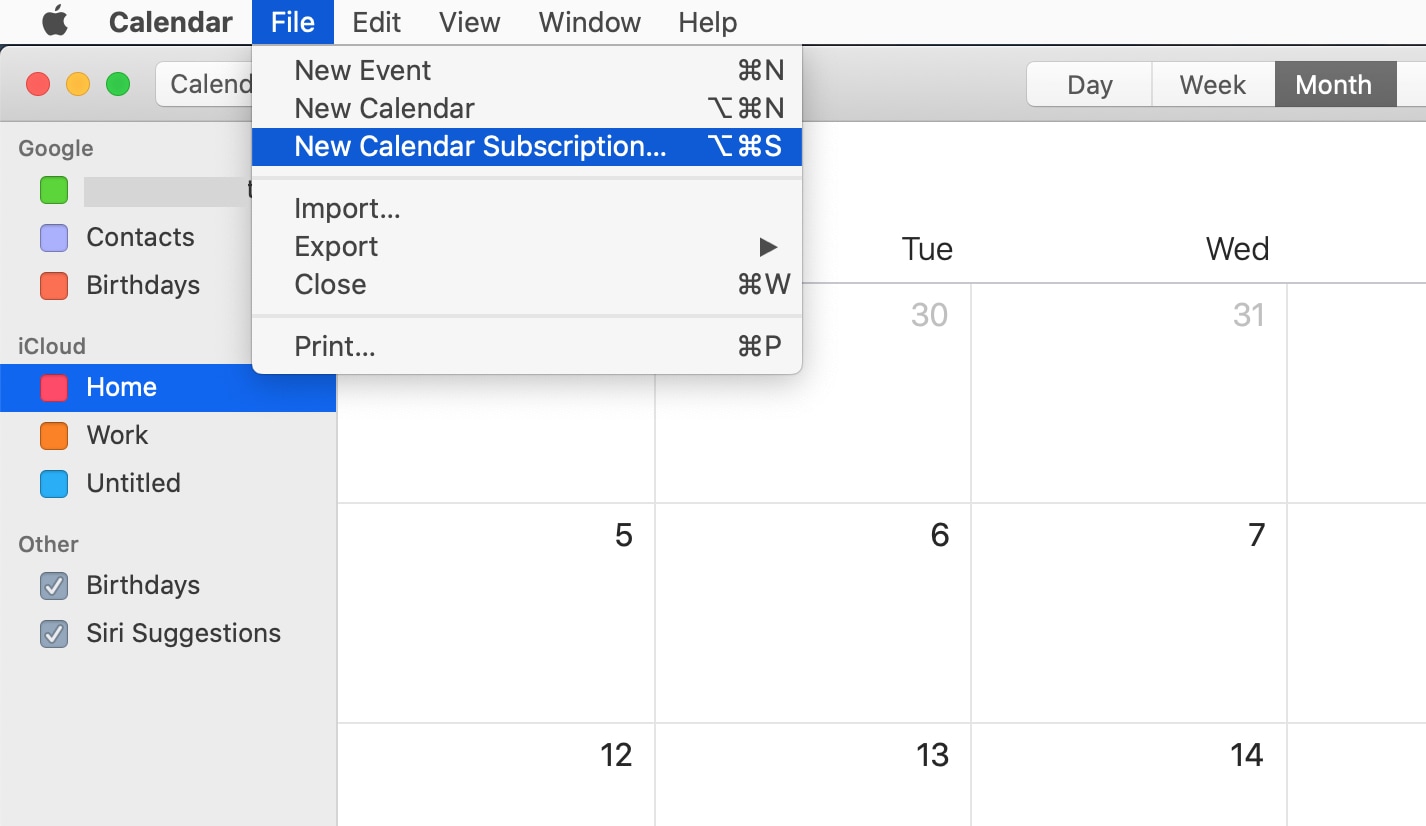
4. Click File > New Calendar Subscription.
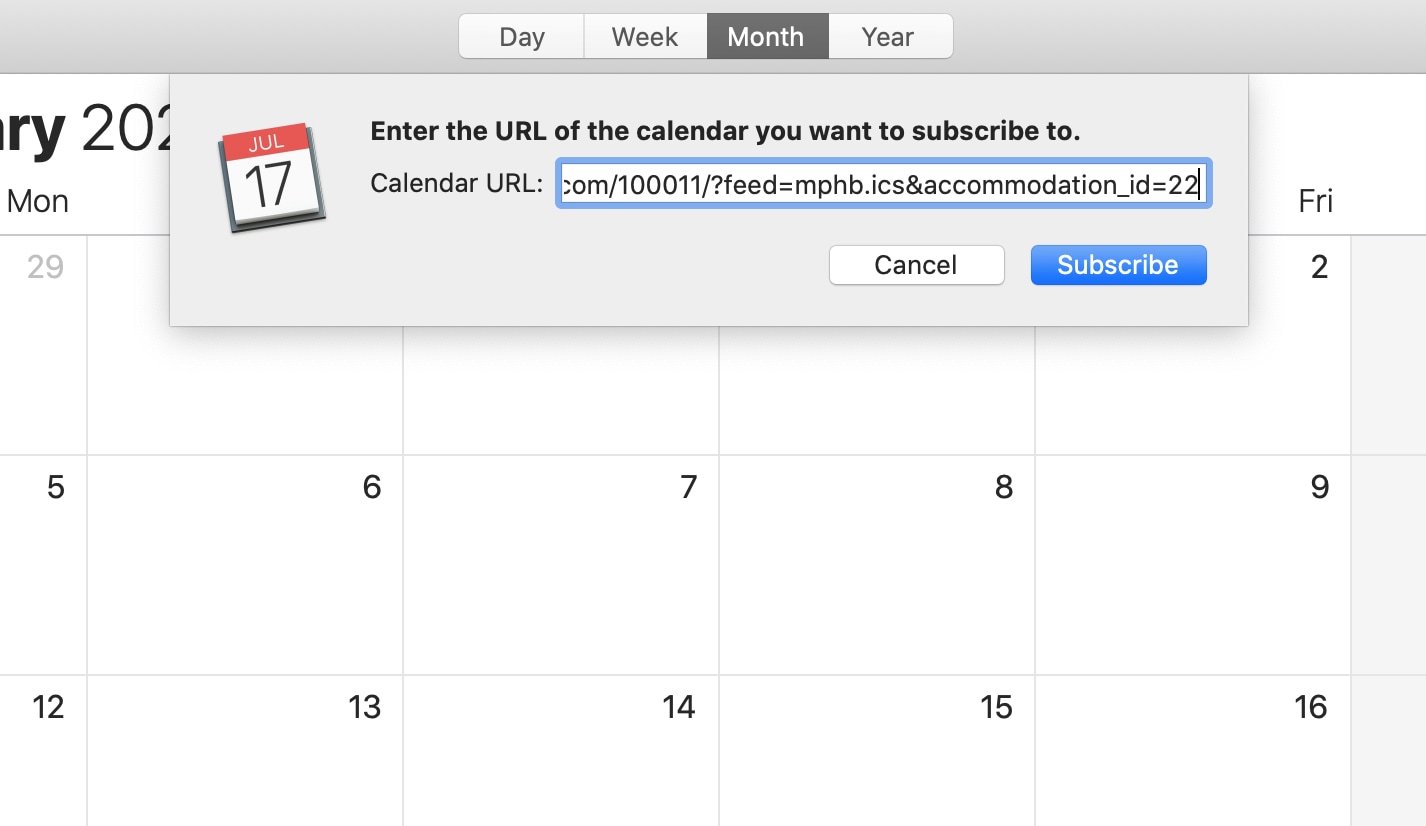
5. Paste the previously copied link in the dialog box.
In the dialog box, paste the previously copied link of your property calendar into the provided field and click the ‘Subscribe’ button.
6. Add a calendar name and choose how often to refresh the calendar.

Unlike Google Calendar, you can control synchronization intervals.
7. Apple Calendar will try to fetch all bookings made for this property on your website and display them.
You can click on a booking to view its details.
8. Create a new calendar to export bookings.
While the “Calendar Subscription” is read-only, which means you can only import bookings from your website, to create new bookings in Apple Calendar and export them back to your website (BNBForms account), you must create a new calendar.
9. Click File > New Calendar.
The new calendar will appear on the left side of the screen. Give it a name.
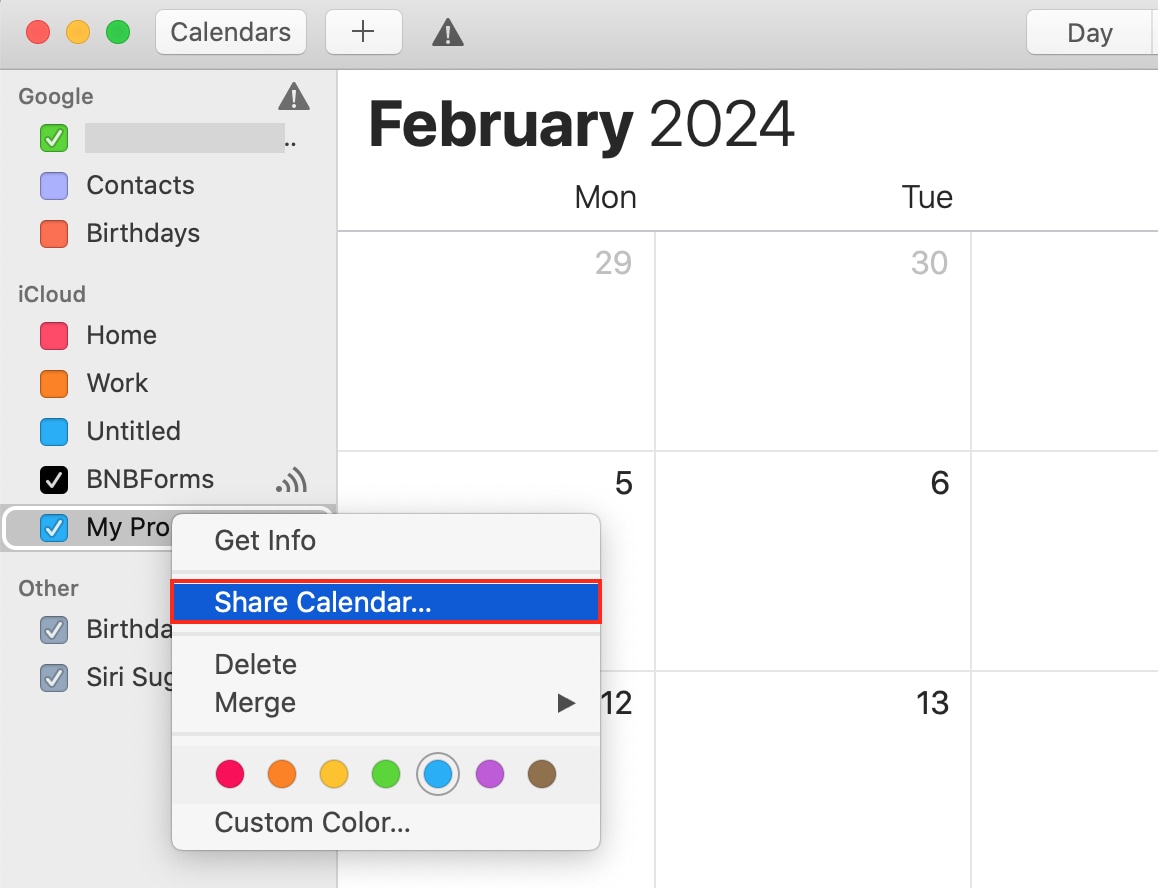
10. Share the calendar.
Right-click on the created calendar, then choose ‘Share Calendar’.
11. Make the calendar public.
In the dialog box, choose ‘Public Calendar’ and click ‘Done’.
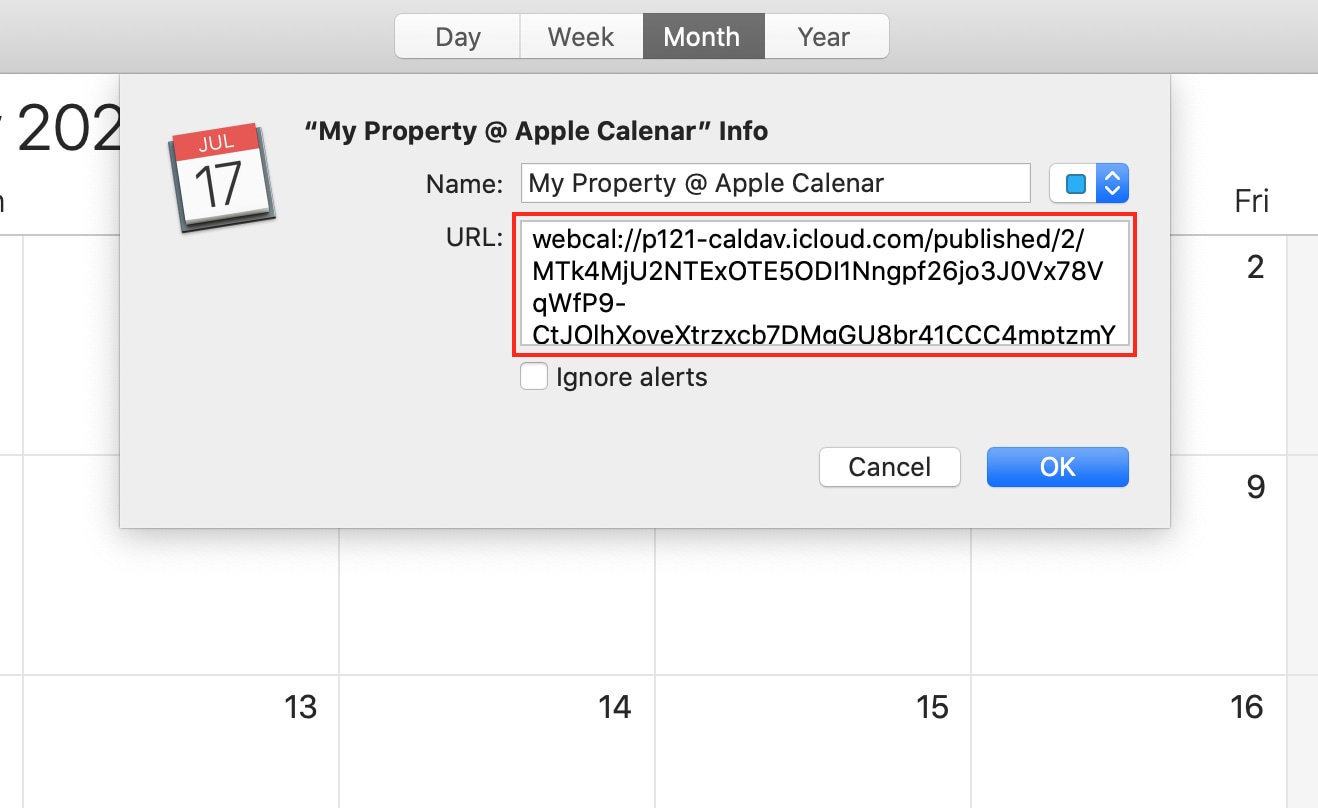
12. Right-click on the created calendar and choose ‘Get Info’.
13. Copy the calendar URL.
In the dialog box, copy the calendar URL.
14. Navigate to Dashboard > Bookings > Sync Calendars and click the ‘Edit button’ under chosen property.
15. Click the ‘Add New Calendar’ button and paste the calendar URL of your Apple Calendar.
Click the ‘Update’ button.
16. Create a booking or time blocking in your Apple Calendar.
In Apple Calendar, switch to the Month view and select dates you would like to mark as booked or blocked.
In the opened popup, add the title, description, and choose a calendar associated with your property. We created this calendar earlier in this tutorial.

If you’ve enabled automatic calendar synchronization, you can either wait for the automatic synchronization process or navigate to Dashboard > Bookings > Sync Calendars and click the ‘Sync All External Calendars’ button to synchronize immediately.
Navigate to Dashboard > Bookings > Calendar. If synchronization was successful, you will find a new booking imported from your Apple Calendar. Hover over or click on it to see details.

To enable automatic external calendars synchronization, navigate to Dashboard > Accommodation > Settings and scroll down to the Calendars Synchronization Scheduler section.
How to force Google Calendar to update a subscribed Calendar
Google Calendar’s iCal sync can be slow, with updates taking up to 48 hours, according to their documentation. For faster refreshes, consider Google Apps Script (by @derekantrican) which allows automatic sync every N minutes for any given subscribed calendar.
https://github.com/derekantrican/GAS-ICS-Sync
Follow these steps to run the script:
1. Navigate to following URL
2. On the left-hand side of the screen, choose the Overview menu.
3. Click the “Copy” icon on the top right.
4. Scroll down to the line #28 and replace iCal URLs with your data.
Example:
[
    "https://bnbforms.com/100011/?feed=mphb.ics&accommodation_id=22",
    "BNBForms"
]
, where
https://bnbforms.com/100011/?feed=mphb.ics&accommodation_id=22– is the iCal URL of a calendar;BNBForms– is the name of a calendar in the Google Calendar.
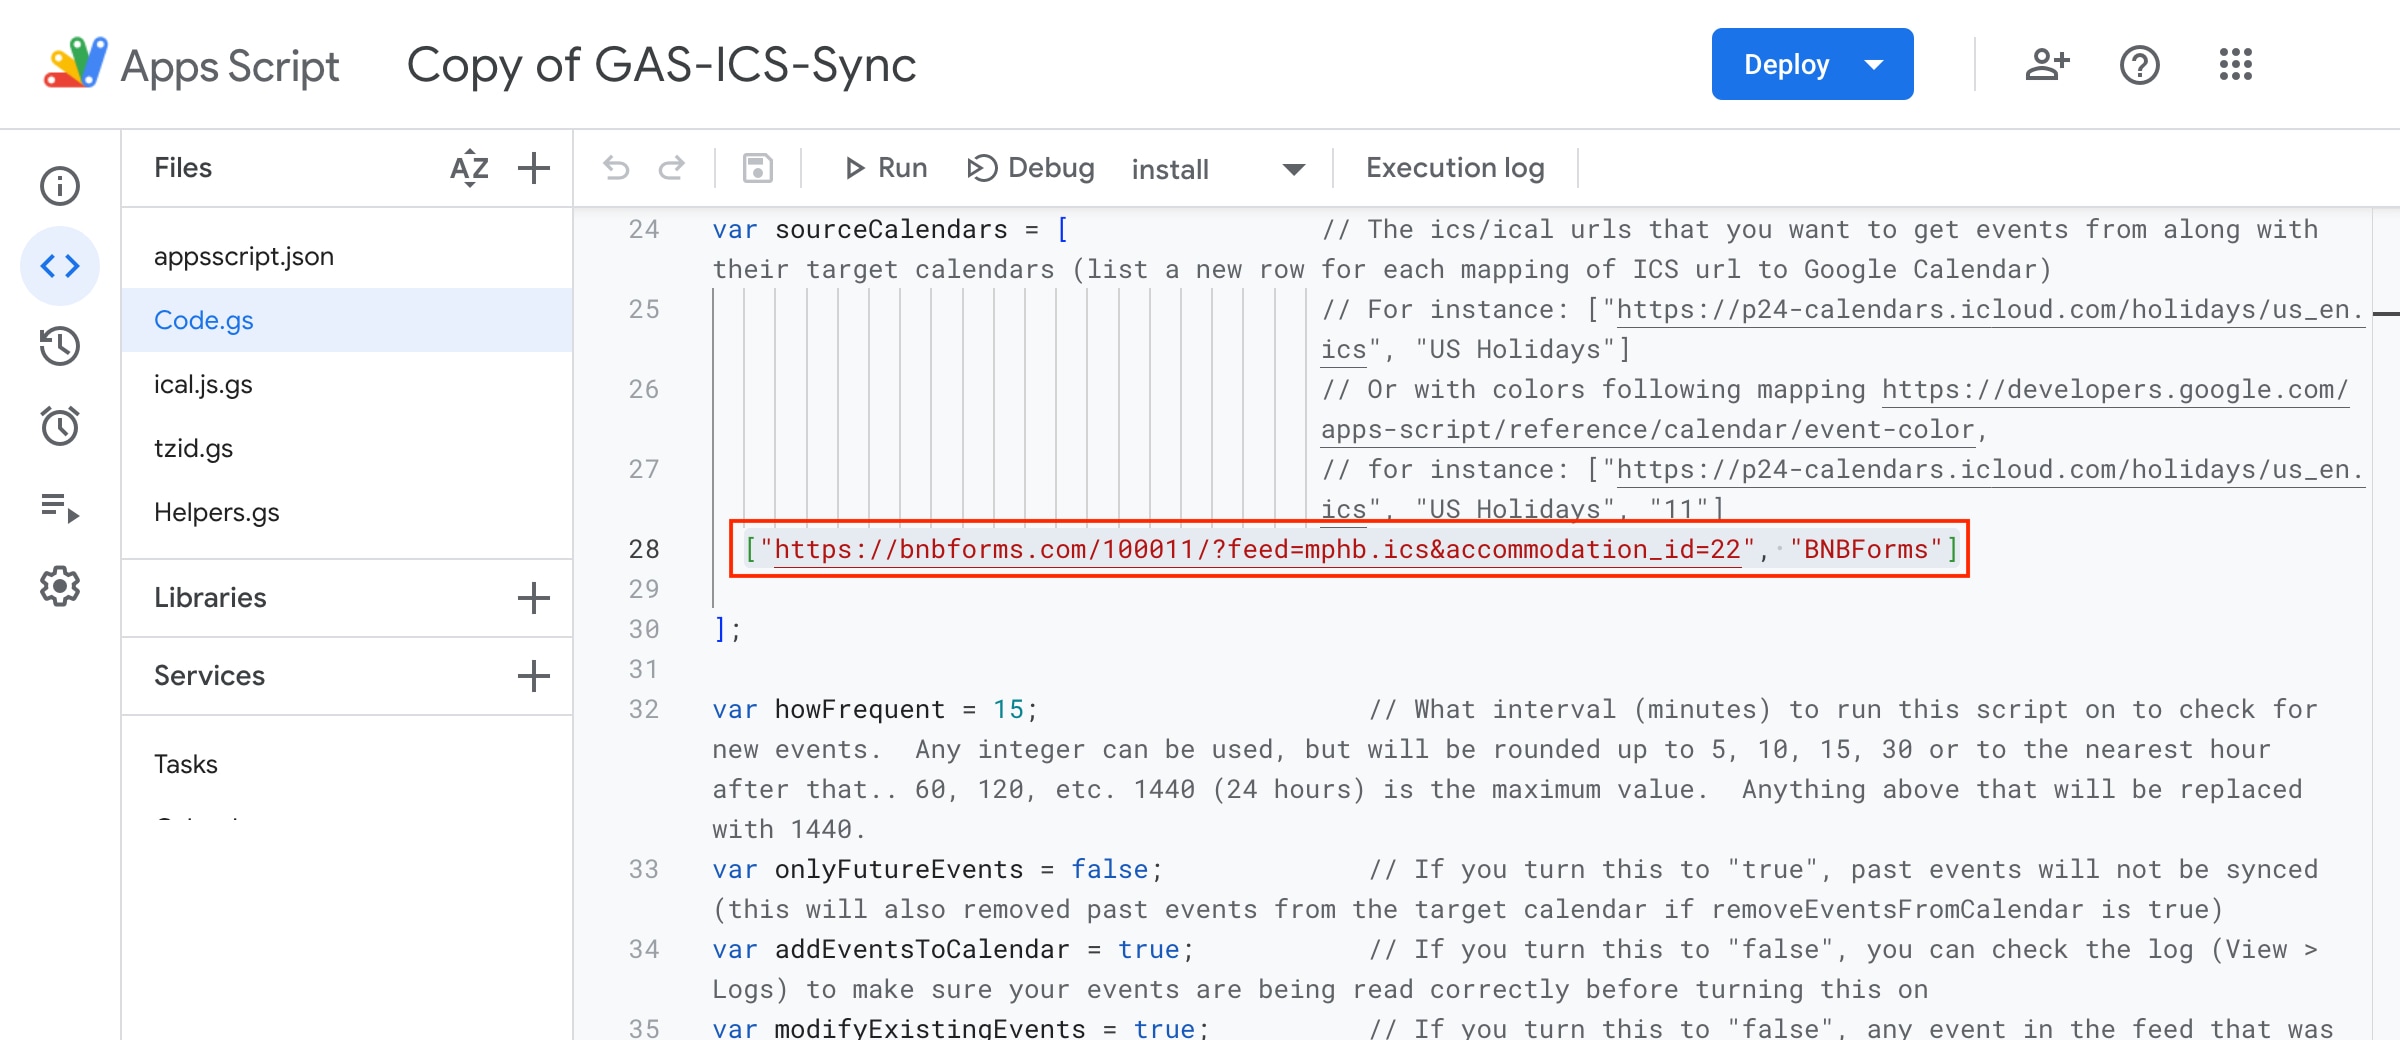
5. Click the ‘Save’ button on the top panel.
6. Make sure your toolbar says “Install” to the right of “Debug”, then click “Run”.
7. You will be prompted to authorize the program and will need to click “Advanced” > “Go to GAS-ICS-Sync (unsafe)”.

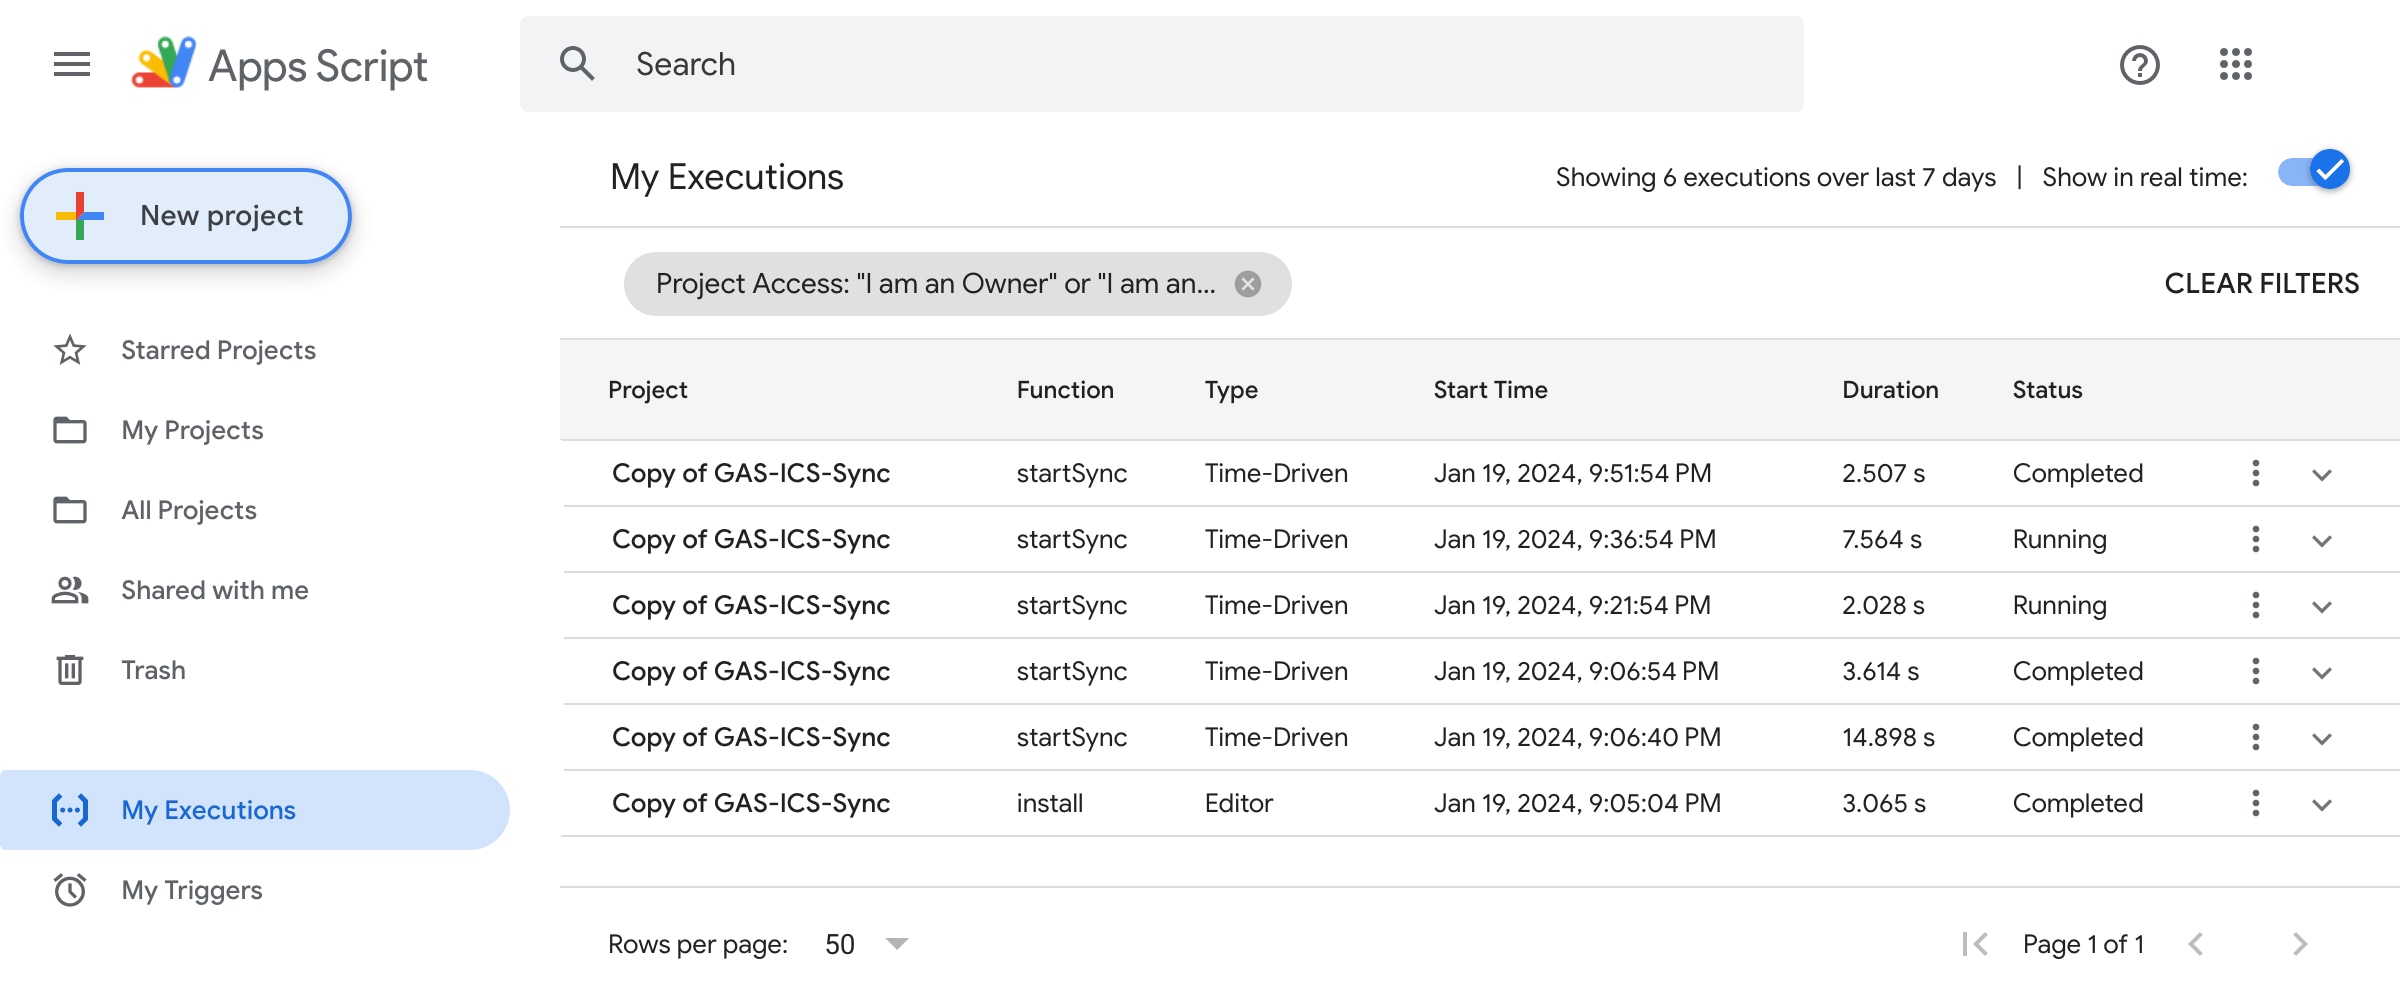
8. You can check script executions and logs of synchronization following this URL
https://script.google.com/home/executions
On the image below, you will see that the script executes with the default 15-minute interval.
9. To stop the script (optional).
To stop the script, open it from your account at https://script.google.com/home/, change the dropdown to the right of “Debug” from “Install” to “Uninstall”, then click Run.
10. Result.
If you check your Google Calendar after the script execution, you will find two calendars with the name “BNBForms” in our case.
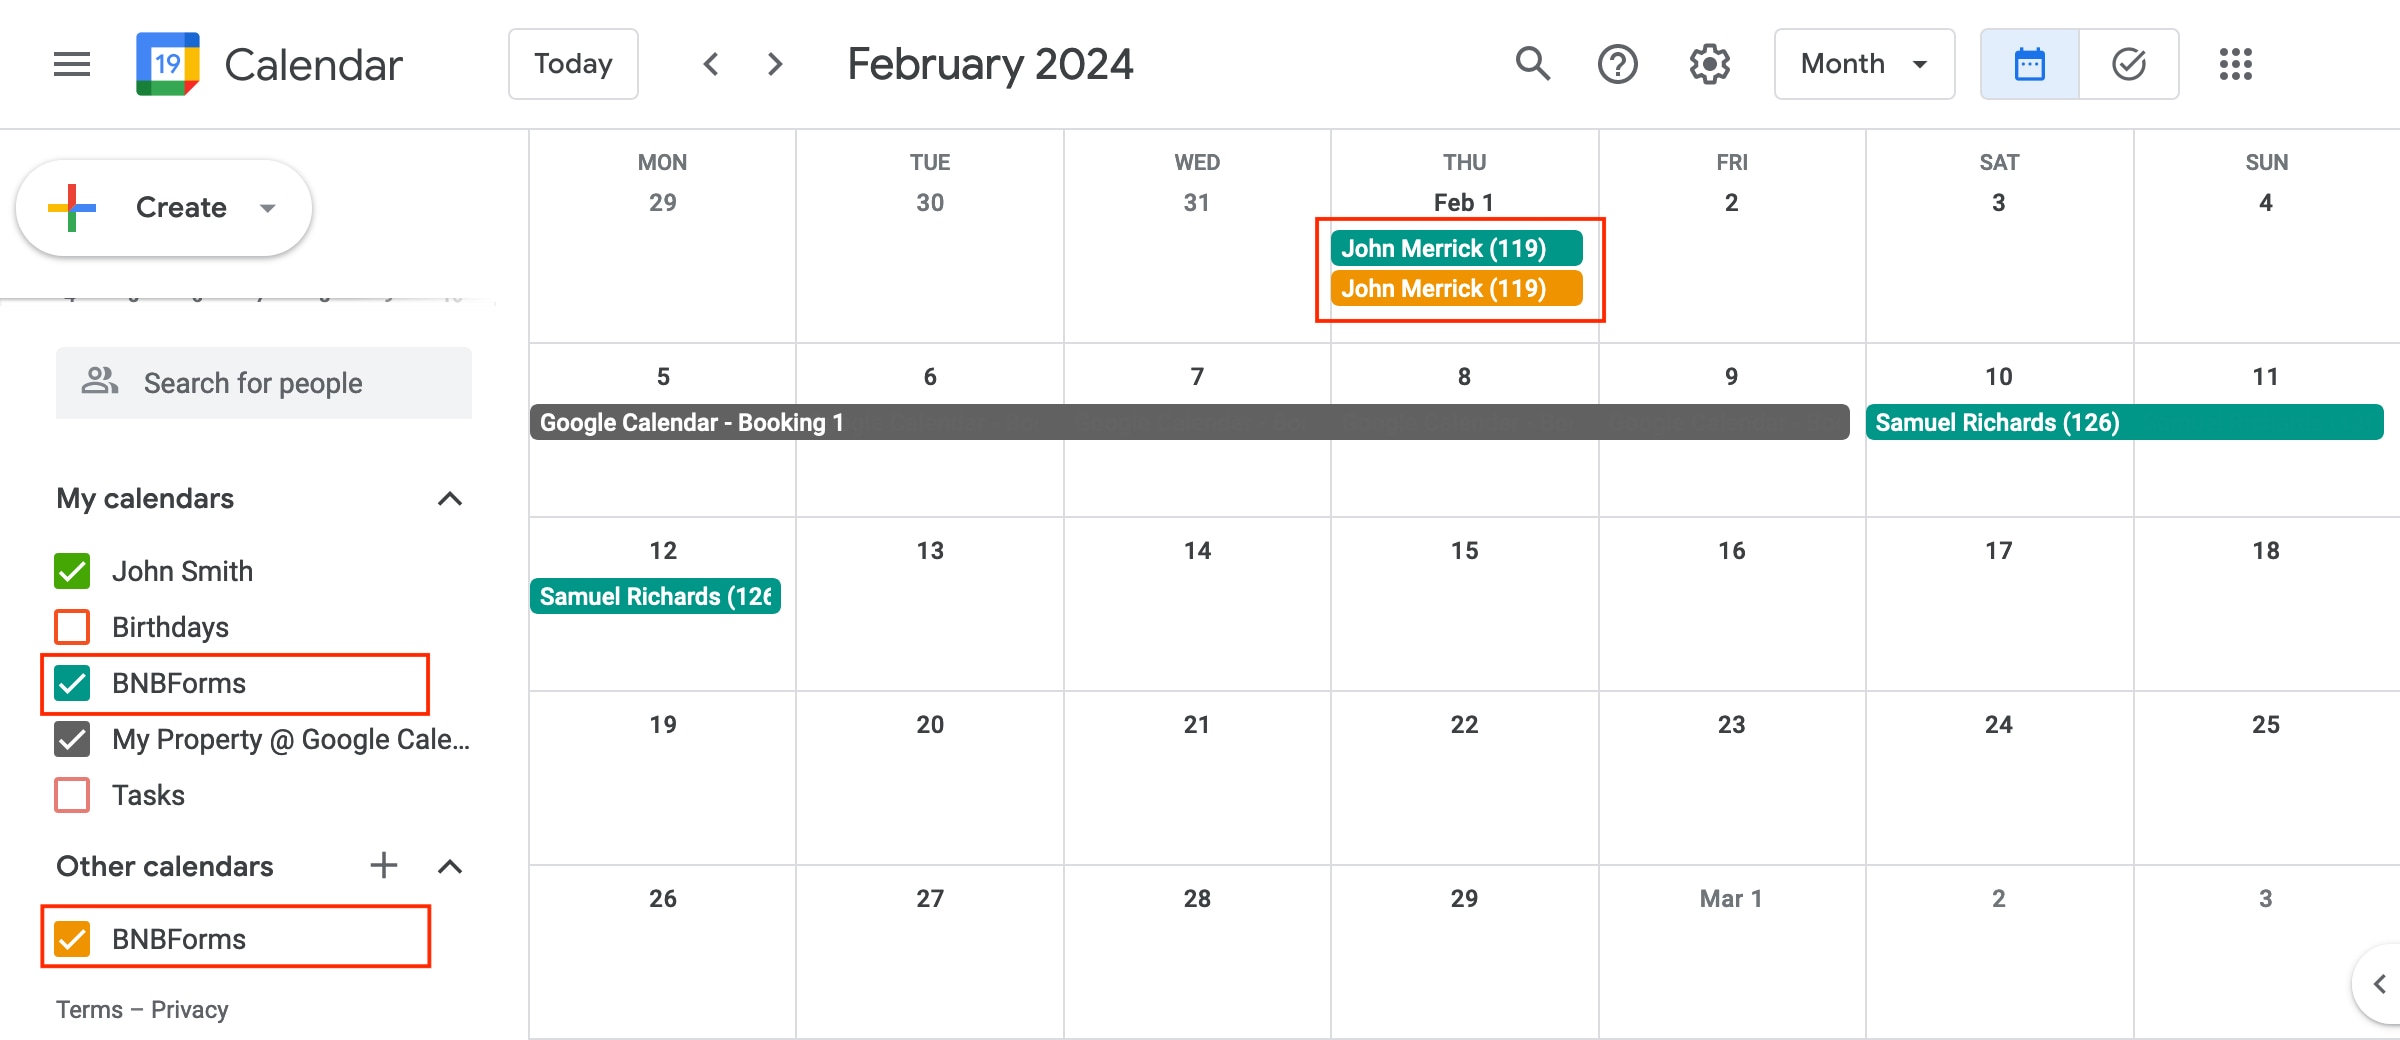
This is because the script doesn’t actually force Google to update your external calendar created following this tutorial. It creates a new calendar and processes the calendar feed separately.